Day 28 – Cardinals in Winter with Silent Sparkle

A Peaceful CASE of GDP524 Inspired by Cordula De

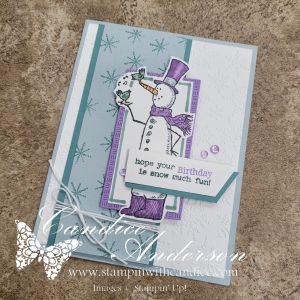
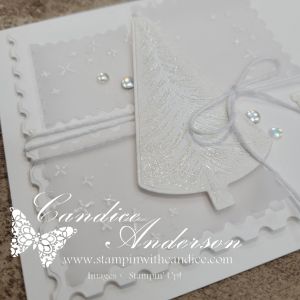
Today’s themes were all about the quiet beauty of winter—the hush of falling snow and the peaceful stillness it brings. When I saw the prompt, I immediately thought of the Global Design Project #GDP524, where we were challenged to CASE a gorgeous winter design by Cordula De. It was the perfect layout and technique for today’s soft, serene inspiration.

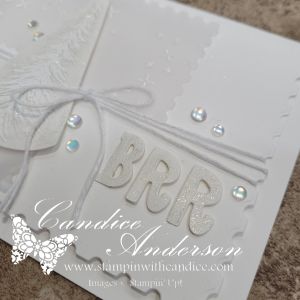
I’ve admired so many beautiful samples created for this challenge, and I wanted to keep my version simple and close to the original. The result is a calm, snowy design with just a touch of sparkle and one bright, cheerful pop of cardinal red.


❄️ Snowflakes & Soft Winter Hues

For the snowflakes since I don’t have the current set, I reached for the retired Joyful Flurry (#159804) stamp set. It was just the right style—delicate and elegant—for a peaceful winter card.

Color combo:

  • Pool Party
  • Lost Lagoon

Soft, icy, and perfect for silent snowfall vibes.

To build the background, I used a sneak peek of an upcoming product—
the Lovely Stripes 3D Embossing Folder (#167179).
It added gorgeous texture without overwhelming the design.


🟥 Adding a Subtle Cardinal Touch

The cardinal element turned out to be trickier than I expected—I realized I don’t have many bird stamps! But tucked deep in my stash, I found the perfect tiny cardinal in the very old Jolly Bingo Bits set. It was just the right size for a small pop of color without taking over the card.

I colored the little bird using my Stampin’ Write Markers (hot tip: these are on the Last Chance List, so make sure you grab yours before they’re gone!). I fussy-cut the cardinal and popped it up with a Mini Dimensional.


🎨 Masking, Texturing & Sparkling

For the main technique:

  1. I cut a piece of Masking Paper (#155480) to 1″ × 2-3/4″.
  2. I placed it where I wanted my sentiment to be, then stamped my snowflakes.
  3. For the two larger snowflakes, I stamped off first to soften the look.
  4. The smallest snowflake was stamped full strength for contrast.
  5. A little Wink of Stella added the perfect bit of winter sparkle.

To add texture to the focal panel, I lightly distressed the edges with the side of my scissors. It gives such a soft, handcrafted look.

And while the card didn’t need ribbon… I really loved the gentle touch it added.
I tucked a strip of the retired White Woven Ribbon (#164634) behind the focal piece and tied a tiny knotted embellishment with a Mini Glue Dot.


Quick, Easy, & Peacefully Wintery

This card came together so quickly—and I absolutely love the gentle, snowy look paired with that tiny burst of cardinal red. It’s amazing how a simple design can carry so much quiet charm.

👉 You can shop current Stampin’ Up! supplies and tools here:
Shop with Me Here

A beautifully crafted Christmas card featuring a window scene that displays a peaceful nativity setting on one side, while the inside is adorned with cozy holiday elements like hanging stockings and warm colors.

Please feel free to contact me if you have any questions.

Contact me today to place your order!
435-232-2655 Cell ( Call or Text)
andersoncandice@hotmail.com


💕 Let’s Stay Connected

📺 YouTube
📘 Facebook
📸 Instagram
📌 Pinterest

#StampinWithCandice #StamperCandi #ACardADayInNovember2025 #30DayChristmasCardMakingChallenge #ChristmasCards #HandmadeCards #CreativeTechniques #HolidayCrafting #cardmaker #cardmaking #christmascards #handmadecards #papercraft #StampinUpKits #christmaschallenge

Day 27 – Farmhouse Holiday: Ready to Jingle & Mingle

A Little Red Truck, a Christmas Tree, and the Perfect Thanksgiving Crafting Day

Happy Thanksgiving!
I honestly can’t think of a better way to celebrate than spending time doing what I love—crafting! And when today’s theme brought together Farmhouse Holiday + Jingle & Mingle, I knew exactly what I wanted to play with.

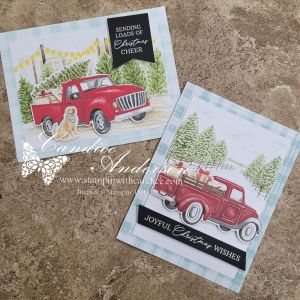
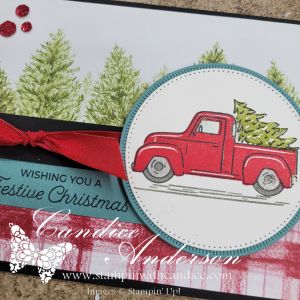
Because if you know me (or if you’ve ever stepped foot into my home during the holidays), you already know I’m obsessed with the little red truck hauling a Christmas tree. I have plenty of decorations to prove it! So when Stampin’ Up! released the Road to Christmas Kit (#166227), I knew immediately it was coming home with me—and I’ve been saving it all month for today’s challenge.

Of course, I started by making the cards exactly as instructed (because the kit is adorable!), but then I wanted to get creative. Today’s featured card is my all-out farmhouse holiday spin with one of my favorite fun elements…

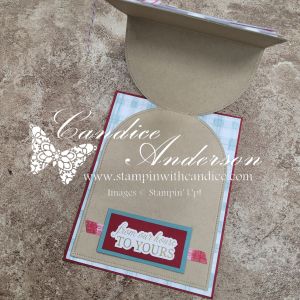
A pop-up arch!

🚚❤️ Building the Pop-Up Arch Feature

To transform the kit pieces into something extra special, I started with the Everyday Arches Dies (#164629).

Layered Arch Design

  • I cut the background piece from the kit using one of the arch dies.
  • Then I cut a slightly larger arch from kraft cardstock.
  • To create the pop-up mechanism, I folded a piece of kraft cardstock in half and cut the arch again—but this time leaving the top edge just over the fold line, so it didn’t cut all the way through.
  • I scored the top of that folded arch at 2-1/2″.
  • Then I attached the full kraft arch to the lower part of the folded piece.
    This allows the entire arch to pop up beautifully when the card opens!

It adds such a fun, dimensional farmhouse feel.


📨 Modifying the Kit Elements

🎄 Card Base Details

To build the card base:

  • I cut the card front from the kit in half.
  • Trimmed it to 5-3/8″ x 4-1/8″.
  • Mounted it on a Cherry Cobbler base cut to 5-1/2″ x 4-1/4″.

💬 Sentiments & Envelope Magic

Instead of using the English phrases from the kit, I grabbed one of the greetings in a different language and layered my own sentiment on top using the Greetings for You Mix & Match Ephemera Pack (#166208).

Then I pulled out one of the kit envelopes (which are WAY too fun to use only as envelopes!). I cut it open and:

  • Trimmed the center to 5-1/4″ x 4″ for another project.
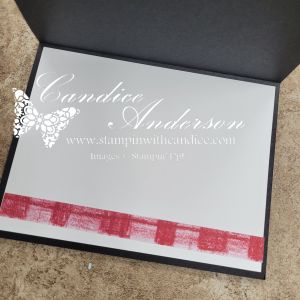
  • Used the leftover side strip as a perfect decorative layer behind my sayings—both outside and inside!

Tip:
You don’t need to put the entire strip behind the whole sentiment—just enough to peek out. That allowed me to stretch the piece for both front and inside sentiments.

For the inside, I layered the sentiment on Cherry Cobbler and Lost Lagoon cardstock so the pop-up arch had something sturdy to catch on when standing.

A bit of red baker’s twine finished the front perfectly.

🎄 Quick, Easy, and Kit-Friendly

One fun thing to note:

There is NO stamping on this card!

Using the kit + ephemera + a few dies made this pop-up card fast, unique, and perfectly on-theme. This is exactly why I love Stampin’ Up!’s kits—they make it so easy to elevate a project with a few added touches.

❤️ What Do You Think?

I love how farmhouse and festive this turned out—and that little red truck makes me happy every time I see it. If you’re a farmhouse Christmas fan too, you will love the Road to Christmas kit.

Would you try a pop-up arch card like this?

✨ Bonus Project!

Remember that extra piece I trimmed from the envelope? I couldn’t resist turning it into another card! I pulled out my beloved retired Trucking Along Set (#162299) and created a fun bonus project using that piece.

I love when a single kit piece inspires multiple cards—and this one came together so easily with that adorable little truck!

Want more details on how I created this bonus card?
Let me know, and I’ll be happy to post a full tutorial! 🚚🎄✨

👉 Want to recreate it? You can shop current Stampin’ Up! supplies and tools here:
Shop with Me Here

A beautifully crafted Christmas card featuring a window scene that displays a peaceful nativity setting on one side, while the inside is adorned with cozy holiday elements like hanging stockings and warm colors.

Please feel free to contact me if you have any questions.

Contact me today to place your order!
435-232-2655 Cell ( Call or Text)
andersoncandice@hotmail.com


💕 Let’s Stay Connected

📺 YouTube
📘 Facebook
📸 Instagram
📌 Pinterest

#StampinWithCandice #StamperCandi #ACardADayInNovember2025 #30DayChristmasCardMakingChallenge #ChristmasCards #HandmadeCards #CreativeTechniques #HolidayCrafting #cardmaker #cardmaking #christmascards #handmadecards #papercraft #StampinUpKits #christmaschallenge

Day 26 – Woodland Christmas Wonderland

A Sneak Peek of a Brand-New Stamp Set!

Today’s themes were both centered around the woods, so it was the perfect opportunity to share a sneak peek from the upcoming Mini Catalog! I’m so excited to introduce you to the brand-new Aspen Grove Stamp Set (#167018). This set is stunning and incredibly versatile—perfect for winter scenes, masculine cards, nature themes, and yes… even Christmas.

I can already tell this is going to be one of my new go-to sets, and I can’t wait to design even more cards with it.


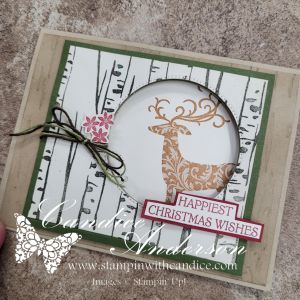
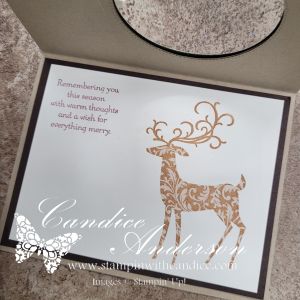
🌲 A Woodland Window Christmas Card

To create today’s project, I paired the new Aspen Grove set with a retired favorite, Dashing Deer (#147728). The deer fit perfectly into the woodland scene and brought the entire design to life.

I chose a muted, natural color palette:

  • Very Vanilla
  • Crumb Cake
  • Pecan Pie
  • Early Espresso
  • Mossy Meadow
  • Touch of Cherry Cobbler (just enough to add color without breaking the rustic feel)

The tones stayed soft and woodsy—perfect for today’s “Woodland Wonderland” vibe.


🦌 The Window Card Technique

I wanted the deer to appear in full on the inside of the card, but only peeking through the trees from the front. The Stylish Shapes Dies (#159183) worked beautifully to make this window opening.

Important tip:
I originally tried cutting four layers at once… and quickly found out that wasn’t going to happen! 😆
I ended up cutting two layers at a time and working my way through the stack. Much better results!


🌳 Texture & Finishing Touches

The Birch Wood 3D Embossing Folder added amazing texture to the front panel. Once embossed, I used a Blending Brush to lightly add ink over the raised areas—making the grain pop and deepening the woodland feel.

To finish the design, I wrapped the card with Early Espresso and Old Olive Linen Thread (#165986). The natural fibers tied the whole rustic theme together perfectly.


🎁 What Do You Think?

I’m so excited about this new Aspen Grove set. It’s unique, natural, and incredibly inspiring—and I can’t wait for you to get your hands on it next month!

Are you excited to try this set for yourself?
I’d love to hear what you think of today’s sneak peek and window card!

👉 You can shop current Stampin’ Up! supplies and tools here:
Shop with Me Here

A beautifully crafted Christmas card featuring a window scene that displays a peaceful nativity setting on one side, while the inside is adorned with cozy holiday elements like hanging stockings and warm colors.

Please feel free to contact me if you have any questions.

Contact me today to place your order!
435-232-2655 Cell ( Call or Text)
andersoncandice@hotmail.com


💕 Let’s Stay Connected

📺 YouTube
📘 Facebook
📸 Instagram
📌 Pinterest

#StampinWithCandice #StamperCandi #ACardADayInNovember2025 #30DayChristmasCardMakingChallenge #ChristmasCards #HandmadeCards #CreativeTechniques #HolidayCrafting #cardmaker #cardmaking #christmascards #handmadecards #papercraft #sketchchallenge #christmaschallenge

Day 24 – Twinkle All the Way & Tree-mendous Wishes

A Sparkly Technique Using Iridescent Treat Bags!

Day 24 is here, and today was full of sparkle with the themes Twinkle All the Way and Tree-mendous Wishes. On my live, I shared a fun technique using the Iridescent Treat Bags (#166204) in a completely unexpected way to create a gorgeous, shimmering background.

Two handmade holiday cards featuring intricate sparkling trees, each tagged with the word 'merry', set against a softly colored background with embellishments.

If you missed the live, be sure to catch the replay—you’ll definitely want to try this one!


Using Treat Bags for Sparkle (In a Whole New Way!)

The magic of this card starts with the treat bags themselves. Instead of using them as packaging, I cut the bag apart to create a flat section large enough to run through my die-cutting machine.

Then I glued that piece directly onto my background cardstock.

Because these bags have a beautiful pink/yellow iridescent shimmer, the color shifts depending on the cardstock behind it:

  • My first sample used Pretty in Pink
  • During the live, I used Bubble Bath

Both produce totally different looks, and that’s what makes this technique so fun!

For today’s project, I paired the shimmer with the retired Decorative Trees Dies (#164084) for a clean, elegant seasonal look.


🎄 Building the Card

To keep things quick and easy, I went straight to page 24 of the Annual Catalog and pulled inspiration from one of the tag templates. (If you need a catalog, send me a message—I’d be happy to get one to you!)

Here’s how the card came together:

Layers & Elements

  • Background: Silent Snowfall Designer Series Paper (#166062)
  • Tree Layering:
    • One solid shimmery tree
    • One intricate tree cut from Peaceful Garden Glimmer Paper (#165929) layered on top
  • Tag & Sentiment:
    • Cut using the Merry Tags & More Dies #(#165639)
    • Tag created from the Celebration Expressions Memories & More Card Pack (#165307)
      • Not a Christmas pack—but the colors and designs worked perfectly (and bonus: tons of great backgrounds for future cards or scrapbook pages!)

Finishing Touches

  • Sheer Balmy Blue Ribbon (#165767)
  • White Baker’s Twine (#155475)
  • Strawberry Slush & Pretty in Pink Gems (#165615)

And one fun detail about this project:
There is no stamping on the entire card!
It’s a great reminder of how versatile your dies, embellishments, Memories & More packs, and specialty papers can be.

Card on top is Bubble Bath Background – Card on bottom is Pretty in Pink Background.


🌟 Bonus Samples

I also created a few additional samples to showcase how cool it looks when you emboss the iridescent treat bags. On the shaker card sample, I paired the treat bag layer with white cardstock—you can really see the yellow shimmer come to life!

This is definitely a technique worth trying on multiple projects.

👉 You can shop current Stampin’ Up! supplies and tools here:
Shop with Me Here

A beautifully crafted Christmas card featuring a window scene that displays a peaceful nativity setting on one side, while the inside is adorned with cozy holiday elements like hanging stockings and warm colors.

Please feel free to contact me if you have any questions.

Contact me today to place your order!
435-232-2655 Cell ( Call or Text)
andersoncandice@hotmail.com


💕 Let’s Stay Connected

📺 YouTube
📘 Facebook
📸 Instagram
📌 Pinterest

#StampinWithCandice #StamperCandi #AC

Day 23 – Elfie Time!

Fun Fold Gift Card Holder + Sketch Challenge #5

Today’s theme was Elfie Time, and the moment I read it, I knew exactly which stamp set I had to pull out—my beloved retired #Elfie (#150509). Pairing it with Sketch Challenge #5 inspired a playful twist: a Fun Fold Gift Card Holder!

This design is so easy to create and perfect for the holidays—because who doesn’t love receiving (or giving!) a cute handmade gift card holder?

I shared the full tutorial during a live in the Card A Day in November 2025 group as well as on my YouTube and Facebook pages. If you missed it, no worries—you can still catch the replay. And huge thanks to Kevin for inviting me on to share this project!


🎁 How to Make the Fun Fold Gift Card Holder

This fold comes together quickly and can be decorated for any theme or season. Here’s the basic template:

Card Base

  • Cut: 9-1/2″ x 5-1/2″
  • Score at: 3-1/2″ and 7-1/2″
    This creates:
  • A 3-1/4″ panel (the main front)
  • A 4-1/4″ panel (the inside)
  • A 2″ flap (perfect for the pocket)

Belly Band

  • Cut: 1-1/2″ x 8-1/2″ (or longer depending on embellishments)
  • Wrap loosely around the card so it slides easily.

Gift Card Cutout

You’ll need circle punches or dies:

  • 1-3/4″ for the pocket opening (#119850)
  • 2″ for the decorative circle layer (#133782)

Interior Layer

If you’re using a different color inside:

  • Cut 2-1/2″ x 5-1/4″
  • Make sure it extends past the punched opening for a clean look.

Tools That Help

  • Bone folder (#102300)
  • Tear & Tape (#154031)
  • Mini Glue Dots (#103683)
  • Mini Stampin’ Dimensionals (#144108)
  • Circle punches/dies

And then… decorate to your heart’s content!


🧝 Elfie Samples

Of course I made more than one! Here’s what I used:

Elfie Cards

Color combos:

  • Poppy Parade, Pool Party, Summer Splash
    Others:
    • White Baker’s Twine (#155475)
    • Real Red & White Peppermint Embellishments (#164050)
    • Strawberry Slush and Pretty in Pink Gems (#165615)
    • Forever Plaid Embossing Folder (#164049)
    • A Little Cheer (#166121)
    • Stylish Shapes Dies (#159183)
    • Wink of Stella (#141897)
    • Blending Brush (#160518)
    • Masking Paper (#155480)
    • Blends – Poppy Parade, Summer Splash, Pool Party, Pecan Pie, Petal Pink, Pretty in Pink

Both versions turned out adorable and festive!


❄️ Additional Sample – Christmas Cuties

I also made a version using the retired Christmas Cuties (#139787) paired with the Need for Tweed Designer Series Paper (#166144) for a quick, textured background.

Color combo:

  • Mossy Meadow, Old Olive, Cherry Cobbler
    Others:
    • Real Red Baker’s Twine (#164051)
    • Shimmer Star Foam Stickers (#166202)
    • A Little Cheer (#166121)
    • Perennial Postage Dies (#162607)

A different look but just as charming!


🎄 Do You Love This Fun Fold as Much as I Do?

I adore how quick and adaptable this Fun Fold Gift Card Holder is, and I can’t wait to see what you create with it!

If you try this fold, please share your photos—I love seeing everyone’s creative twist on the design.

👉 You can shop current Stampin’ Up! supplies and tools here:
Shop with Me Here

A beautifully crafted Christmas card featuring a window scene that displays a peaceful nativity setting on one side, while the inside is adorned with cozy holiday elements like hanging stockings and warm colors.

Please feel free to contact me if you have any questions.

Contact me today to place your order!
435-232-2655 Cell ( Call or Text)
andersoncandice@hotmail.com


💕 Let’s Stay Connected

📺 YouTube
📘 Facebook
📸 Instagram
📌 Pinterest

#StampinWithCandice #StamperCandi #ACardADayInNovember2025 #30DayChristmasCardMakingChallenge #ChristmasCards #HandmadeCards #CreativeTechniques #HolidayCrafting #cardmaker #cardmaking #christmascards #handmadecards #papercraft #sketchchallenge #christmaschallenge

Day 21 – Santa “Don’t Stop Believin’”

Rockin’ Santa & Snow Globe Dreams (with a Grinch-Inspired Twist!)

Today’s challenge theme was Santa — Don’t Stop Believin’, and my mind went in a dozen different directions before I landed on the perfect idea. Those of you who know me well know that I am a huge Grinch fan. (Yes… he even has his own dedicated section of my Christmas décor!)

There’s a classic image of the Grinch holding a Christmas ornament, and I thought, How perfect would that be for this theme? So I decided to recreate that scene using our amazing Stampin’ Up! products.

Once the idea hit, the wheels started turning fast.

To really bring the magic to life, and because I love pushing the boundaries of our products, I decided to take it up a notch and turn it into a snow globe shaker card using my Flip Flap Technique (which I’m still claiming as my own unless someone can show me otherwise 😉). This time, I added an extra twist — slimline card, giving me plenty of room for the full Grinch-inspired scene.

And yes… the moment you step outside the “intended use” of our products, things get creative fast. This card is no exception! Let’s just say… this card was an adventure!


🎄 Creating the Ornament

The ornament was actually the easy part!

  • Stylish Shapes Dies (#159183) for the circle
  • Gold Foil Sheets (#132622) for the topper
  • Topper from Ornamental Christmas (#166000)
  • Cherry Cobbler Baker’s Twine (#164051) for the hanging string

Simple, classic, and instantly recognizable.


💚 Crafting the Grinch’s Hand

This was where things got… creative.

No die gave me exactly what I wanted, so I sketched the Grinch’s hand by hand (pun intended 😉) and cut it from Lemon Lime Twist cardstock.

To add the Grinch’s signature “fur,” I stamped one of the leaf images from the Cheers & Sips set (#165588) in Granny Apple Green. The texture was perfect!

Then I added:

  • Granny Apple Green Stampin’ Blends for outlining
  • Blending Brush for shading
  • A hand-cut “Santa sleeve” in Real Red, brushed with black ink
  • And the perfect finishing touch — Fluffy Trim Ribbon (#165849) for the cuff

This combination brought the Grinch’s hand to life exactly the way I pictured it.


❄️ The Background & Final Touches

For the snowy scene, I used the gorgeous Silent Snowfall Specialty DSP (#166062) and added sparkle with a touch of Wink of Stella on the snowflakes.

A few Real Red & White Peppermint embellishments (#164050) tied the festive vibe together.


🌟 Creating the Slimline Flip Flap Shaker

This shaker section was the fun part!

How I Built It:

  • Cut Granny Apple Green cardstock to 7″.
  • Score at 3-1/2″.
  • Trim 1/16″ off one side.
  • Fold in half.
  • Layer the snowflake DSP on top.
  • Die-cut through all three layers at the same time using the Stylish Shapes circle.
    • You may need to run it through more than once, but cutting all layers together guarantees perfect alignment.

With the leftover piece of cardstock, I scored it again at 3-1/2″, leaving a 1/2″ tab to connect both pieces.

For this card I used the 3×3 Flip Flaps (#166514). There are multiple different sizes and the one you use will depend on how big your cutout is.

Here’s a quick video of how to assemble it.

Shaker Fillers:

  • Loose Gold Sequins (#165267)
  • White hearts from the Loose Valentine’s Assortment (#167074)—a fun sneak peek from our January 2027 Mini preorder!

Everything was sealed together using Tear & Tape.

Important Tip:

Always plan what the interior will look like through the window.
Whatever you stamp inside becomes part of the scene!


💬 Interior Details

Because you definitely can’t put a standard “Merry Christmas” in a Grinch-inspired snow globe card… 😄

I used the Mini Alphabet Dies (#162934) to create my own custom sentiment. Pairing these dies with Adhesive Sheets (#152334) is a must — instant letter stickers for easy placement!

To finish the little interior scene I used:

  • Pine Tree Trimmings Stamps (#166040)
  • Pine Tree Trimmings Dies (#166046)
  • A Little Cheer (#166121)
  • Jar of Joy (#166176)
  • And to complete it all, a sweet little heart from the Darling Dinos Dies (#164734)

Many elements shows through the shaker window, adding a beautiful layered effect.


❤️ The Finished Look

This card was definitely on the advanced end of the crafting spectrum, but the result is exactly the whimsical, storybook look I hoped for. A little Santa magic, a little Grinch mischief, and a whole lot of creativity.

It’s playful.
It’s nostalgic.
It’s unexpected.
And it absolutely makes me smile.

Sometimes the “big idea” cards are the ones that make you stop, smile, and believe—and this one did exactly that for me.


👉 Want to recreate it? You can shop current Stampin’ Up! supplies and tools here:
Shop with Me Here

A beautifully crafted Christmas card featuring a window scene that displays a peaceful nativity setting on one side, while the inside is adorned with cozy holiday elements like hanging stockings and warm colors.

Please feel free to contact me if you have any questions.

Contact me today to place your order!
435-232-2655 Cell ( Call or Text)
andersoncandice@hotmail.com


💕 Let’s Stay Connected

📺 YouTube
📘 Facebook
📸 Instagram
📌 Pinterest

#StampinWithCandice #StamperCandi #ACardADayInNovember2025 #30DayChristmasCardMakingChallenge #ChristmasCards #HandmadeCards #CreativeTechniques #HolidayCrafting #cardmaker #cardmaking #christmascards #handmadecards #papercraft #sketchchallenge #christmaschallenge