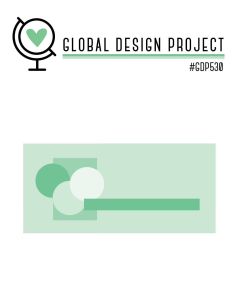
Finding Inspiration Through Casing a Designer | #GDP528

Casing Inspiration: Three Unique Card Designs

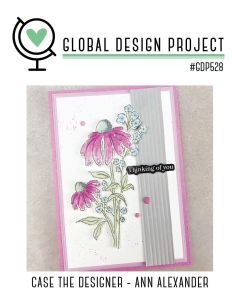
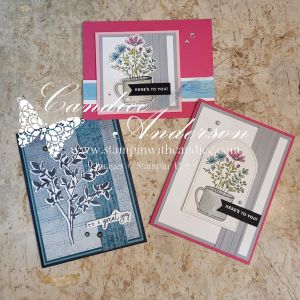
A card design featuring pink flowers and blue accents, with a stamped greeting saying 'Thinking of you,' framed by a gray vertical panel, and a pink border.

I don’t know about you, but inspiration is often one of the hardest parts of creating. Looking at what you have and figuring out how to turn it into something that not only speaks to you—but to others as well—can feel overwhelming at times. That’s where casing comes into play.

Casing (Copy And Share Everything) is one of my favorite ways to spark creativity. I often look to other designers when I need a jump-start, and the Global Design Project – Case the Designer challenges are a perfect source of inspiration.

This week we cased designer Ann Alexander, and during my live I shared how I pulled different elements from her card to inspire three very different designs of my own.


Card One – Same Layout, New Look

A handmade card featuring a botanical illustration of leaves in white on a textured blue background, with a greeting that says 'to a great guy'.

For my first card, I stayed fairly true to the original layout, but changed things up by using very different colors and imagery. I started with one of the new suites coming in January, Nature Walk (#166936), and used several elements from the suite including the stamp set, dies, Designer Series Paper, and embellishments.

To keep this card simple, I let the DSP do most of the work and added a stamped leaf image in Secret Sea along with a simple greeting. This is a great example of how keeping the layout but changing the products can completely transform a design.


Card Two – Color Combo with a Twist

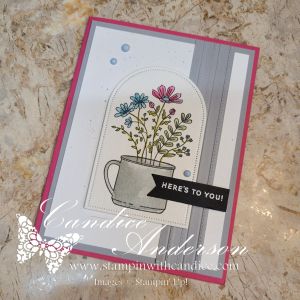
Card featuring a floral arrangement in a cup with a greeting that says 'HERE'S TO YOU!', set against a layered background of gray and pink.

For my second card, I wanted to focus more on the color inspiration while still using the basic design—this time with a bit of a twist. Because the floral image in Weekend Adventures (#167318) isn’t a large focal image like the cased card, I chose to frame it using the Everyday Arches Dies (#164629).

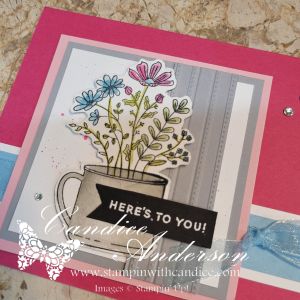
I stamped the image on Watercolor Paper (#149612) and colored it using Water Painters (#168253) with ink pads for a soft, blended look. The greeting was heat-embossed in white on black cardstock and punched out using the Banner Sayings Bundle (#167051).

To add texture, I used the Lovely Stripes 3D Embossing Folder (#167179 – coming in January) and kept the color palette clean and bold with Melon Mambo and Smoky Slate cardstock. I finished the card with Muted Palette Dots (#165155) for a subtle pop of detail.


Card Three – Smaller Scale, Same Inspiration

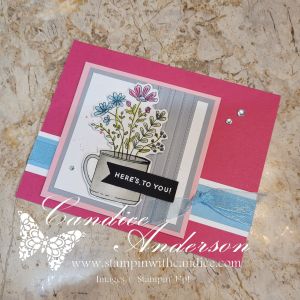
My final card is the one I demonstrated during the live. I kept the same core color palette from card two, but added Balmy Blue and Pretty in Pink cardstock for a softer feel.

This time, I resized the layout to better fit the smaller image by cutting the design down and adjusting the focal point. I also flipped the card and went with a horizontal design rather than a vertical one. I layered Balmy Blue Sheer Ribbon (#165767) behind the image and finished the card with Rhinestone Basic Jewels for just the right amount of sparkle.


A Simple Splatter Technique (Used on All Three Cards)

Across all three cards, I used one of my favorite easy splatter techniques with ink pads and Water Painters. What I love about this method is how versatile it is—you can splatter in any color, make the drops big or small, and it won’t ruin your marker tips or waste ink.

Be sure to watch the video to see just how quick and easy this technique really is!


One Design, Endless Possibilities

A display of three unique greeting cards featuring floral designs, each in different color schemes and layouts. The cards showcase a mix of elements such as stamped images, embellishments, and various backgrounds.

Seeing all three cards together really highlights why I love casing a designer so much. Even though each card was inspired by the same original design, they each have their own personality.

  • One focuses on layout with a fresh color palette
  • One leans into color inspiration with a bold, textured feel
  • And one adjusts the scale and proportions to better fit the image

By changing just a few key elements—colors, focal point size, textures, and embellishments—you can completely transform a design while still honoring the original inspiration.

The final result is three different and unique cards, all sparked by the same design. That’s the beauty of casing—it’s not about copying, it’s about letting someone else’s creativity jump-start your own.

So the next time you’re feeling stuck, take a look at the work of designers you admire and see what elements you can borrow to get your creativity flowing. Let their creativity spark your own. Remember—there’s no right or wrong way to case a card. The goal is simply to get those creative juices flowing and make it yours.


A beautifully crafted Christmas card featuring a window scene that displays a peaceful nativity setting on one side, while the inside is adorned with cozy holiday elements like hanging stockings and warm colors.

Please feel free to contact me if you have any questions.

Contact me today to place your order!
435-232-2655 Cell ( Call or Text)
andersoncandice@hotmail.com
💕 Let’s Stay Connected

📺 YouTube
📘 Facebook
📸 Instagram
📌 Pinterest

🎄Quick & Cute: A Pop-Up Gift Card Holder Anyone Will Love

Merry Christmas! 🎄

I hope you all had a wonderful holiday filled with special moments spent with family and friends. 💛

For my Monday Live, I shared an easy pop-up gift card holder that’s perfect for those last-minute gifts—or for anyone who’s just hard to buy for. I also featured this month’s Product of the Month, the True Blue Florals Designer Series Paper (#167970). You can grab this gorgeous paper for just $5 with a $75 purchase—such a great deal!

I chose to give my project a Christmas feel by using a few holiday sentiments, but this card design and layout work beautifully for any occasion. Simply swap out the greeting and embellishments, and you’re good to go.

During the live, I promised I’d share all the measurements so you can recreate this project at home—so let’s dive in!


Card Front Measurements & Supplies

A collection of patterned papers in shades of blue and purple, with a completed card featuring layered leaves and a sentiment that reads 'Tis the Season'.
  • Card Base:
    • Balmy Blue Cardstock – 8-1/2″ x 5-1/2″ (scored at 4-1/4″)
  • Card Front Layers:
    • True Blue Florals DSP – 5-1/4″ x 4″
    • Balmy Blue Cardstock – 5-1/4″ x 4″
      • Embossed with Lovely Striped Embossing Folder (#167179 – available in January)
  • Die Cuts:
    • Leaves cut from Balmy Blue Cardstock and Vellum (#167099)
    • Dies: Nature’s Symphony Dies (#166925 – available in January)
  • Tag:
    • Basic White – 2-1/2″ x 1-1/4″, cut into a tag
    • Stamped with Ornamental Christmas (#165991) in Night of Navy
    • Mat: Balmy Blue – 2-1/4″ x 1-1/2″
  • Embellishments:
    • Flowers fussy-cut from DSP
    • Muted Palette Dots (#165155)
    • White Baker’s Twine (#155475)

Inside Pop-Up Gift Card Holder

  • Cardstock:
    • Two pieces of Night of Navy Cardstock – 5-1/4″ x 5-1/4″
  • Scoring:
    • Score each piece at 1-1/4″
    • This creates a 1-1/4″ section and a 4″ section
  • Assembly:
    • Attach the two 1-1/4″ sections together (top and bottom) using Tear & Tape (#154031)
    • Use a circle punch to punch a small notch in the outer corner of the 1-1/4″ section
      • This makes it easier to slide the gift card in and out
  • Finishing the Inside:
    • Left side: DSP – 3-3/4″ x 5″
    • Right side: Basic White – 3-3/4″ x 5″
      • Stamp with a coordinating greeting to finish the card
      • Attach the the inside of card.
        • Just a note they are cut so the are centered leaving an 1/8″ border. This helps pull the center apart just slightly and make it easier for the gift card to slide in and out.

Final Thoughts

This card really is super easy to make, and once you’ve made one, you’ll want to make several! It’s perfect for holidays, birthdays, thank-you cards, or any time a gift card is the perfect solution.

If you’d like extra help, be sure to check out my step-by-step video for the full walkthrough. And please—share your creations in the comments! I would absolutely love to see what you come up with.


A beautifully crafted Christmas card featuring a window scene that displays a peaceful nativity setting on one side, while the inside is adorned with cozy holiday elements like hanging stockings and warm colors.

Please feel free to contact me if you have any questions.

Contact me today to place your order!
435-232-2655 Cell ( Call or Text)
andersoncandice@hotmail.com

💕 Let’s Stay Connected

📺 YouTube
📘 Facebook
📸 Instagram
📌 Pinterest


#StampinWithCandice #StamperCandi #HandmadeCards #GiftCardHolder #StampinUp #CardMaking #LastMinuteGifts #Papercrafting #DIYCards #CreativeInspiration #ProductOfTheMonth #HolidayCrafting

Day 30 – Let It Snow!

Merry Little Moments & a Snow-Kissed Finale ❄️

Wow… I can’t believe this is the end of the 30-day challenge. I’m honestly so proud of myself for participating in both challenges every single day. This month stretched me, inspired me, and filled my craft room (and heart!) with joy. Thank you for being here with me through it all!

Today’s theme was Let It Snow – Merry Little Moments, and the goal was to create an all-white card using white layers, vellum, and sparkle for a snow-kissed look. And let me tell you… this one really challenged me.


❄️ Attempt #1… and Why I Started Over

My first try used gold and some retired products, and while it wasn’t bad, it wasn’t the pure snowy look the challenge called for. So I scrapped it and decided to try again.

This time, I went looking for inspiration and came across a gorgeous design I had cased before by the wonderfully talented Melody Hyde. Her vision jump-started my creativity, and I began brainstorming ways to tweak her idea to make it my own.


🎄 A Frosty, Sparkling Design

I stamped the tree from the Ornamental Christmas Stamp Set (#165991) with white ink and embossed in white then cut with the matching Dies (#166000) I used the Perennial Postage Dies (#162607) to create a layered, textured winter scene.

Vellum Panels

I die-cut three small postage shapes from vellum, then stamped the star image from Spooky Halloween (#166192) in White Craft Ink and heat-embossed them in white.

The soft vellum + snowy embossing instantly gave the perfect frosty feel.

The BRR Message

Using the Mini Alphabet Dies (#162934), I cut out the letters BRR.
Tip: To add dimension without wrestling tiny pieces of Dimensional foam, I rolled up Mini Glue Dots to pop the letters up slightly. Perfect lift—zero frustration!

I also brushed each letter with Wink of Stella for a sparkly, icy shimmer.


Wink of Stella Magic

Did you know you can use Wink of Stella with the emboss resist technique?
I used it on my die-cut tree, and the sparkle settled right into the embossed design. It created the most beautiful, snowy glow—subtle but magical.


🎀 Finishing Details

To complete the card:

  • I tied it together with White Baker’s Twine
  • Added Frosted Iridescent Dots (#165766) for the perfect snow-kissed sparkle
  • Kept everything in soft whites and vellum layers for that peaceful winter moment

This final project feels serene, frosty, and completely fitting for the last day of the challenge.


❤️ Reflecting on the Challenge

One of today’s prompts was to share my favorite card from the entire month… and honestly? I’m not sure I can. There were so many I loved creating for different reasons.

But my favorite part of this challenge wasn’t any single card—
it was sharing each project with you, reading your comments, and having you join me along the way. Thank you again to everyone who crafted, encouraged, watched, liked, or simply followed along.

A digital banner for a card-making challenge featuring a snowy blue background with snowflakes, text reading 'Card a Day in November! Card Making Challenge Christmas Card Edition DAY 30 Let it Snow!'

I hope you’ll continue to join me as I keep sharing what I love.
Here’s to many more Merry Little Moments together. ❄️❤️


👉 You can shop current Stampin’ Up! supplies and tools here:
Shop with Me Here

A beautifully crafted Christmas card featuring a window scene that displays a peaceful nativity setting on one side, while the inside is adorned with cozy holiday elements like hanging stockings and warm colors.

Please feel free to contact me if you have any questions.

Contact me today to place your order!
435-232-2655 Cell ( Call or Text)
andersoncandice@hotmail.com

💕 Let’s Stay Connected

📺 YouTube
📘 Facebook
📸 Instagram
📌 Pinterest

#StampinWithCandice #StamperCandi #ACardADayInNovember2025 #30DayChristmasCardMakingChallenge #ChristmasCards #HandmadeCards #CreativeTechniques #HolidayCrafting #cardmaker #cardmaking #christmascards #handmadecards #papercraft #StampinUpKits #christmaschallenge

Day 28 – Cardinals in Winter with Silent Sparkle

A Peaceful CASE of GDP524 Inspired by Cordula De

Today’s themes were all about the quiet beauty of winter—the hush of falling snow and the peaceful stillness it brings. When I saw the prompt, I immediately thought of the Global Design Project #GDP524, where we were challenged to CASE a gorgeous winter design by Cordula De. It was the perfect layout and technique for today’s soft, serene inspiration.

I’ve admired so many beautiful samples created for this challenge, and I wanted to keep my version simple and close to the original. The result is a calm, snowy design with just a touch of sparkle and one bright, cheerful pop of cardinal red.


❄️ Snowflakes & Soft Winter Hues

For the snowflakes since I don’t have the current set, I reached for the retired Joyful Flurry (#159804) stamp set. It was just the right style—delicate and elegant—for a peaceful winter card.

Color combo:

  • Pool Party
  • Lost Lagoon

Soft, icy, and perfect for silent snowfall vibes.

To build the background, I used a sneak peek of an upcoming product—
the Lovely Stripes 3D Embossing Folder (#167179).
It added gorgeous texture without overwhelming the design.


🟥 Adding a Subtle Cardinal Touch

The cardinal element turned out to be trickier than I expected—I realized I don’t have many bird stamps! But tucked deep in my stash, I found the perfect tiny cardinal in the very old Jolly Bingo Bits set. It was just the right size for a small pop of color without taking over the card.

I colored the little bird using my Stampin’ Write Markers (hot tip: these are on the Last Chance List, so make sure you grab yours before they’re gone!). I fussy-cut the cardinal and popped it up with a Mini Dimensional.


🎨 Masking, Texturing & Sparkling

For the main technique:

  1. I cut a piece of Masking Paper (#155480) to 1″ × 2-3/4″.
  2. I placed it where I wanted my sentiment to be, then stamped my snowflakes.
  3. For the two larger snowflakes, I stamped off first to soften the look.
  4. The smallest snowflake was stamped full strength for contrast.
  5. A little Wink of Stella added the perfect bit of winter sparkle.

To add texture to the focal panel, I lightly distressed the edges with the side of my scissors. It gives such a soft, handcrafted look.

And while the card didn’t need ribbon… I really loved the gentle touch it added.
I tucked a strip of the retired White Woven Ribbon (#164634) behind the focal piece and tied a tiny knotted embellishment with a Mini Glue Dot.


Quick, Easy, & Peacefully Wintery

This card came together so quickly—and I absolutely love the gentle, snowy look paired with that tiny burst of cardinal red. It’s amazing how a simple design can carry so much quiet charm.

👉 You can shop current Stampin’ Up! supplies and tools here:
Shop with Me Here

A beautifully crafted Christmas card featuring a window scene that displays a peaceful nativity setting on one side, while the inside is adorned with cozy holiday elements like hanging stockings and warm colors.

Please feel free to contact me if you have any questions.

Contact me today to place your order!
435-232-2655 Cell ( Call or Text)
andersoncandice@hotmail.com

💕 Let’s Stay Connected

📺 YouTube
📘 Facebook
📸 Instagram
📌 Pinterest

#StampinWithCandice #StamperCandi #ACardADayInNovember2025 #30DayChristmasCardMakingChallenge #ChristmasCards #HandmadeCards #CreativeTechniques #HolidayCrafting #cardmaker #cardmaking #christmascards #handmadecards #papercraft #StampinUpKits #christmaschallenge

Day 26 – Woodland Christmas Wonderland

A Sneak Peek of a Brand-New Stamp Set!

Today’s themes were both centered around the woods, so it was the perfect opportunity to share a sneak peek from the upcoming Mini Catalog! I’m so excited to introduce you to the brand-new Aspen Grove Stamp Set (#167018). This set is stunning and incredibly versatile—perfect for winter scenes, masculine cards, nature themes, and yes… even Christmas.

I can already tell this is going to be one of my new go-to sets, and I can’t wait to design even more cards with it.


🌲 A Woodland Window Christmas Card

To create today’s project, I paired the new Aspen Grove set with a retired favorite, Dashing Deer (#147728). The deer fit perfectly into the woodland scene and brought the entire design to life.

I chose a muted, natural color palette:

  • Very Vanilla
  • Crumb Cake
  • Pecan Pie
  • Early Espresso
  • Mossy Meadow
  • Touch of Cherry Cobbler (just enough to add color without breaking the rustic feel)

The tones stayed soft and woodsy—perfect for today’s “Woodland Wonderland” vibe.


🦌 The Window Card Technique

I wanted the deer to appear in full on the inside of the card, but only peeking through the trees from the front. The Stylish Shapes Dies (#159183) worked beautifully to make this window opening.

Important tip:
I originally tried cutting four layers at once… and quickly found out that wasn’t going to happen! 😆
I ended up cutting two layers at a time and working my way through the stack. Much better results!


🌳 Texture & Finishing Touches

The Birch Wood 3D Embossing Folder added amazing texture to the front panel. Once embossed, I used a Blending Brush to lightly add ink over the raised areas—making the grain pop and deepening the woodland feel.

To finish the design, I wrapped the card with Early Espresso and Old Olive Linen Thread (#165986). The natural fibers tied the whole rustic theme together perfectly.


🎁 What Do You Think?

I’m so excited about this new Aspen Grove set. It’s unique, natural, and incredibly inspiring—and I can’t wait for you to get your hands on it next month!

Are you excited to try this set for yourself?
I’d love to hear what you think of today’s sneak peek and window card!

👉 You can shop current Stampin’ Up! supplies and tools here:
Shop with Me Here

A beautifully crafted Christmas card featuring a window scene that displays a peaceful nativity setting on one side, while the inside is adorned with cozy holiday elements like hanging stockings and warm colors.

Please feel free to contact me if you have any questions.

Contact me today to place your order!
435-232-2655 Cell ( Call or Text)
andersoncandice@hotmail.com


💕 Let’s Stay Connected

📺 YouTube
📘 Facebook
📸 Instagram
📌 Pinterest

#StampinWithCandice #StamperCandi #ACardADayInNovember2025 #30DayChristmasCardMakingChallenge #ChristmasCards #HandmadeCards #CreativeTechniques #HolidayCrafting #cardmaker #cardmaking #christmascards #handmadecards #papercraft #sketchchallenge #christmaschallenge

Day 25 – Yule Be Amazed – Color combo

Playful Woodland Critters + Witty Wordplay + Color Challenge #5

Today’s challenge brought together two fun themes: Yule Be Amazed—full of playful woodland critters and witty wordplay—and Color Challenge #5 using the Concord & 9th palette of Wildberry, Lakefront, and Harbor.

To match this with Stampin’ Up! colors, I chose a bright, cheerful combination of Lost Lagoon, Balmy Blue, and Melon Mambo. At first, I wasn’t sure how to bring both themes into one card. Woodland critters made me think browns and greens… not exactly what this color combo offers!

So I turned to my wall of retired stamp sets in search of inspiration—and that’s when the answer practically jumped off the shelf.


⛄️ When Snowmen Become Woodland Critters

I spotted the retired Spirited Snowmen Set (#148072) and instantly thought of one of my favorite children’s books—
“Snowmen at Night” by Caralyn Buehner, illustrated by Mark Buehner.

In the story, the snowmen come to life and play outside in the woods after dark. And that’s when it hit me:
If snowmen can play in the woods at night… why can’t they count as playful woodland critters?

With that little spark, everything fell into place.


🎨 Coloring the Scene

To get a soft, playful look, I stamped the snowman in Black StazOn (#101406) on Watercolor Paper (#149612).

Then I used my Water Painters (#168253) and the ink pads in my three challenge colors to bring him to life. Watercoloring gave the image a gentle, whimsical feel—perfect for the theme—and made it easy to blend shadowing under him so it looks like he’s skating on ice.

For additional details, I used:

  • Pumpkin Pie (nose)
  • Pecan Pie (arms)
  • Basic Gray (skates)

A touch of Wink of Stella on the snowman and skates added the perfect shimmer.


❄️ Building the Background

To create the snowy nighttime feel, I used the Snowy Delights Decorative Masks (#165808) with a blending brush. The soft Balmy Blue and Lost Lagoon inks blended beautifully behind the snowman and tied the entire color combo together.


🎀 Finishing Touches

The final details pulled everything together:

  • Balmy Blue Sheer Ribbon (#165767)
  • Three Banner Punch (#167050) for the sentiment
  • A soft matting layer in challenge colors

The finished card is sweet, whimsical, and full of playful charm—perfect for sharing a little holiday cheer.


👉 You can shop current Stampin’ Up! supplies and tools here:
Shop with Me Here

A beautifully crafted Christmas card featuring a window scene that displays a peaceful nativity setting on one side, while the inside is adorned with cozy holiday elements like hanging stockings and warm colors.

Please feel free to contact me if you have any questions.

Contact me today to place your order!
435-232-2655 Cell ( Call or Text)
andersoncandice@hotmail.com

💕 Let’s Stay Connected

📺 YouTube
📘 Facebook
📸 Instagram
📌 Pinterest

#StampinWithCandice #StamperCandi #ACardADayInNovember2025 #30DayChristmasCardMakingChallenge #ChristmasCards #HandmadeCards #CreativeTechniques #HolidayCrafting #cardmaker #cardmaking #christmascards #handmadecards #papercraft #christmaschallenge