Rockin’ Santa & Snow Globe Dreams (with a Grinch-Inspired Twist!)

Today’s challenge theme was Santa — Don’t Stop Believin’, and my mind went in a dozen different directions before I landed on the perfect idea. Those of you who know me well know that I am a huge Grinch fan. (Yes… he even has his own dedicated section of my Christmas décor!)
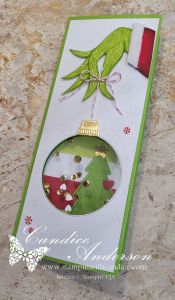
There’s a classic image of the Grinch holding a Christmas ornament, and I thought, How perfect would that be for this theme? So I decided to recreate that scene using our amazing Stampin’ Up! products.
Once the idea hit, the wheels started turning fast.
To really bring the magic to life, and because I love pushing the boundaries of our products, I decided to take it up a notch and turn it into a snow globe shaker card using my Flip Flap Technique (which I’m still claiming as my own unless someone can show me otherwise 😉). This time, I added an extra twist — slimline card, giving me plenty of room for the full Grinch-inspired scene.
And yes… the moment you step outside the “intended use” of our products, things get creative fast. This card is no exception! Let’s just say… this card was an adventure!
🎄 Creating the Ornament
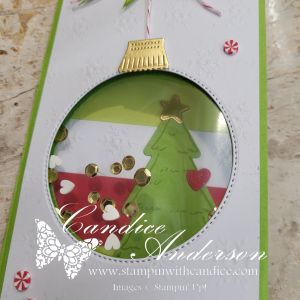
The ornament was actually the easy part!
- Stylish Shapes Dies (#159183) for the circle
- Gold Foil Sheets (#132622) for the topper
- Topper from Ornamental Christmas (#166000)
- Cherry Cobbler Baker’s Twine (#164051) for the hanging string
Simple, classic, and instantly recognizable.
💚 Crafting the Grinch’s Hand
This was where things got… creative.
No die gave me exactly what I wanted, so I sketched the Grinch’s hand by hand (pun intended 😉) and cut it from Lemon Lime Twist cardstock.
To add the Grinch’s signature “fur,” I stamped one of the leaf images from the Cheers & Sips set (#165588) in Granny Apple Green. The texture was perfect!
Then I added:
- Granny Apple Green Stampin’ Blends for outlining
- Blending Brush for shading
- A hand-cut “Santa sleeve” in Real Red, brushed with black ink
- And the perfect finishing touch — Fluffy Trim Ribbon (#165849) for the cuff
This combination brought the Grinch’s hand to life exactly the way I pictured it.
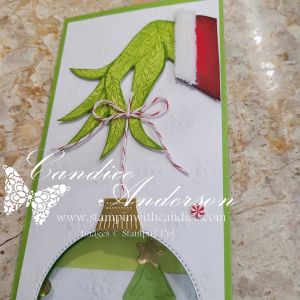
❄️ The Background & Final Touches
For the snowy scene, I used the gorgeous Silent Snowfall Specialty DSP (#166062) and added sparkle with a touch of Wink of Stella on the snowflakes.
A few Real Red & White Peppermint embellishments (#164050) tied the festive vibe together.
🌟 Creating the Slimline Flip Flap Shaker
This shaker section was the fun part!
How I Built It:
- Cut Granny Apple Green cardstock to 7″.
- Score at 3-1/2″.
- Trim 1/16″ off one side.
- Fold in half.
- Layer the snowflake DSP on top.
- Die-cut through all three layers at the same time using the Stylish Shapes circle.
- You may need to run it through more than once, but cutting all layers together guarantees perfect alignment.
With the leftover piece of cardstock, I scored it again at 3-1/2″, leaving a 1/2″ tab to connect both pieces.
For this card I used the 3×3 Flip Flaps (#166514). There are multiple different sizes and the one you use will depend on how big your cutout is.
Here’s a quick video of how to assemble it.
Shaker Fillers:
- Loose Gold Sequins (#165267)
- White hearts from the Loose Valentine’s Assortment (#167074)—a fun sneak peek from our January 2027 Mini preorder!
Everything was sealed together using Tear & Tape.
Important Tip:
Always plan what the interior will look like through the window.
Whatever you stamp inside becomes part of the scene!
💬 Interior Details

Because you definitely can’t put a standard “Merry Christmas” in a Grinch-inspired snow globe card… 😄
I used the Mini Alphabet Dies (#162934) to create my own custom sentiment. Pairing these dies with Adhesive Sheets (#152334) is a must — instant letter stickers for easy placement!
To finish the little interior scene I used:
- Pine Tree Trimmings Stamps (#166040)
- Pine Tree Trimmings Dies (#166046)
- A Little Cheer (#166121)
- Jar of Joy (#166176)
- And to complete it all, a sweet little heart from the Darling Dinos Dies (#164734)
Many elements shows through the shaker window, adding a beautiful layered effect.
❤️ The Finished Look
This card was definitely on the advanced end of the crafting spectrum, but the result is exactly the whimsical, storybook look I hoped for. A little Santa magic, a little Grinch mischief, and a whole lot of creativity.
It’s playful.
It’s nostalgic.
It’s unexpected.
And it absolutely makes me smile.
Sometimes the “big idea” cards are the ones that make you stop, smile, and believe—and this one did exactly that for me.

👉 Want to recreate it? You can shop current Stampin’ Up! supplies and tools here:
Shop with Me Here

Please feel free to contact me if you have any questions.
Contact me today to place your order!
435-232-2655 Cell ( Call or Text)
andersoncandice@hotmail.com
💕 Let’s Stay Connected
📺 YouTube
📘 Facebook
📸 Instagram
📌 Pinterest
#StampinWithCandice #StamperCandi #ACardADayInNovember2025 #30DayChristmasCardMakingChallenge #ChristmasCards #HandmadeCards #CreativeTechniques #HolidayCrafting #cardmaker #cardmaking #christmascards #handmadecards #papercraft #sketchchallenge #christmaschallenge