Easy Gift Card Holder Fun Fold

Monday’s Live was another Make It With Me Monday, and this month I featured an easy-to-create fun fold gift card holder.

What I love most about this design is just how versatile it is! You can use virtually any Designer Series Paper, stamps, dies, punches, or accessories you already have to completely change the look. And because the gift card is tucked right inside, it’s the perfect gift and card all in one.


Creating the Basic Gift Card Holder

The basic layout starts with a standard 8-1/2″ x 11″ piece of cardstock.

Cut the cardstock lengthwise at 4-1/4″, giving you a piece measuring 4-1/4″ x 11″. Score at 5-1/2″ to create your standard card fold.

To create the gift card pocket, cut 1″ in from one end. Fold this section inward and adhere only along the bottom and outside edge, leaving the inside open so you can slide your gift card into the pocket.

It really is that easy!

All of the designs I shared this week open lengthwise, but don’t let that limit you. You can easily turn the design to create a horizontal card or move the gift card pocket to the opposite side.

I’ve actually used this basic idea before with stamped designs rather than Designer Series Paper. You can check out some of those older projects here: See my previous gift card holder projects


One Layout, Lots of Possibilities

For Monday’s Live, I created my project using the Spooktacular Designer Series Paper for a fun Halloween version. I also shared four additional samples to show just how different this same layout can look when you change the paper, colors, and embellishments.

That’s one of my favorite things about finding a good layout—you don’t have to reinvent the wheel every time you sit down to create. Save the basic design and pull it out whenever you need a quick birthday, thank-you, holiday, congratulations, or just-because gift.

Be sure to watch the replay to see exactly how the card comes together and pick up a few of my tips and tricks along the way.


Find More Inspiration in My Creative Resource Library

My Free Tutorial Library is continually growing as I add new content, but I’m also building it into a resource that helps you quickly find past projects I’ve shared on my blog, YouTube, and social media—all together in one easy-to-find place.

Want access? It’s easy! Join my Creative Resource Community. Along with access to the Free Tutorial Library, you’ll join my email list and receive my newsletter with updates on new tutorials, classes, creative inspiration, and more.

However you choose to be creative, I hope you’ll continue to allow me to inspire you along your creative journey. 🦋

Learn • Connect • Create • Grow

A beautifully crafted Christmas card featuring a window scene that displays a peaceful nativity setting on one side, while the inside is adorned with cozy holiday elements like hanging stockings and warm colors.

💕 Let’s Stay Connected

📺 YouTube 📘 Facebook 📸 Instagram 📌 Pinterest

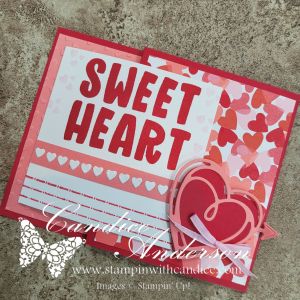
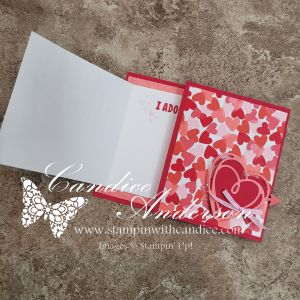
Easy Fun Fold Gift Card Holder Tutorial

On my Monday Live, I shared an easy-to-make fun fold gift card holder inspired by my recent mini album. This sweet project features brand-new products that were released just yesterday, and I absolutely love how simple yet impressive this design is.

Card Base & Structure

Start with a piece of Real Red cardstock cut to 4-1/4″ x 11″.
Score at 5-1/2″ and 9″.

  • The 5-1/2″ section will be on the left side of the card.
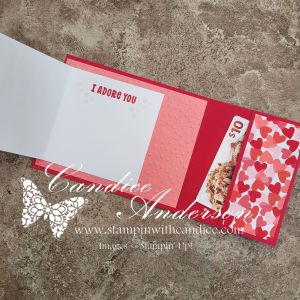
  • Fold the 2″ section inward, then fold again on the 5-1/2″ score line.
  • This creates a pocket on the inside of the card.

Secure the sides of the pocket using Tear & Tape (#154031), leaving the top edge open so you can tuck in a gift card or cash.

Inside Panel

Cut Flirty Flamingo cardstock to 5-1/4″ x 4″ and emboss it using the
Hearts of Love 3D Embossing Folder (#167071).

Attach this to the inside of the card on the 5-1/2″ x 4-1/4″ section.

Designer Series Paper

From the Made with Love Designer Series Paper (#167054), cut:

  • 4″ x 3-1/4″
  • 4″ x 1-3/4″

Place these pieces on:

  • The 3-1/2″ section folded to the front
  • The 2″ section folded inside to form the pocket

Left Folding Panel

Cut Basic White cardstock to 3-1/2″ x 7″ and score in half at 3-1/2″.

Stamp “Sweet Heart” from the Love Story Stamp Set (#167065) on the front and decorate as desired.

Attach this panel centered over the embossed section on the left side of the card base.

For one version, I placed the mini hearts directly on the white panel. For the second card, I added them to a 1/4″ strip of coordinating paper for a slightly different look.

Closure & Finishing Touches

For the closure, cut:

  • One solid heart
  • One lined heart

Using the Endless Love Dies (#167061).
Add arrows if you’d like for extra detail.

Attach the hearts to the front using Stampin’ Dimensionals, creating a small pocket for the folded panel to tuck underneath.

Finish the card with Bubble Bath Faux Linen Ribbon (#167075).


I love how simple and easy this fun fold gift card holder is to make, yet it has such a wow factor. Be sure to check out the video to see the step-by-step process, and I can’t wait to see your ideas using this design and these beautiful new products!


A beautifully crafted Christmas card featuring a window scene that displays a peaceful nativity setting on one side, while the inside is adorned with cozy holiday elements like hanging stockings and warm colors.

Please feel free to contact me if you have any questions.

Contact me today to place your order!
435-232-2655 Cell ( Call or Text)
andersoncandice@hotmail.com


💕 Let’s Stay Connected

📺 YouTube
📘 Facebook
📸 Instagram
📌 Pinterest