As I’ve been working behind the scenes updating my website, one of the pages I’ve been most excited to create is a new section dedicated to the creative challenges I love participating in. Challenges are one of my favorite ways to spark creativity, try new techniques, and look at my supplies in a whole new way.
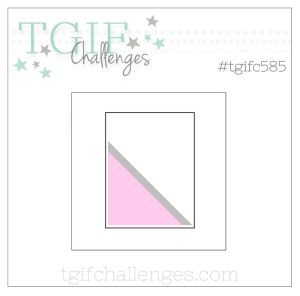
While putting that page together, I came across the TGIF Challenges #TGIFC585 sketch and knew it would be the perfect inspiration for my next project.
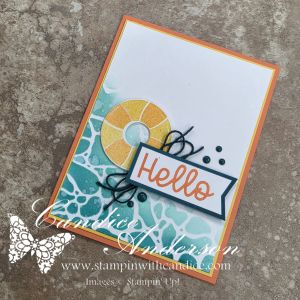
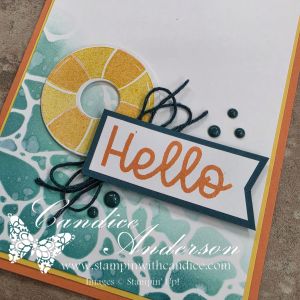
For this card, I reached for the Splash and Relax Bundle to create a bright, cheerful summer design. The sketch immediately made me think of sunshine, water, and relaxing by the pool.
To create the background, I used the Water & Dotted Lines Mask with a blending brush, layering Pool Party, Coastal Cabana, and Pretty Peacock ink to build the water effect. Once the ink was blended, I added a simple splash of water across the background to lift some of the color and create natural texture. It’s one of my favorite techniques because it’s incredibly easy but gives such beautiful results.
One other little detail I love is the baker’s twine. Rather than searching for the perfect color, I started with the gray baker’s twine from the pack and used my blending brush with Pretty Peacock ink to color it. It’s such an easy technique that lets you customize your twine to match any project. Plus, it gives you even more ways to use all the colors included in a multicolor pack!
I finished the card with a bright life preserver, my custom-colored baker’s twine, a simple greeting, and a few embellishments to keep the focus on the fun background.
Sometimes the simplest designs become my favorites, and this one definitely makes me smile. Between the ink-blended background, the water splatter texture, and the colored baker’s twine, this card uses a few easy techniques that add lots of interest without adding much extra work.
If you’ve never tried a sketch challenge before, I encourage you to give one a try. They are a wonderful way to get inspired and stretch your creativity.
Challenge: #TGIFC585
Ready to make your own? For a complete supply list and quick access to all the products used, click here to shop this project.
Love creative challenges or looking for a little inspiration? Be sure to check out the Creative Challenges page in the Learn section of my blog. It’s packed with links to some of my favorite challenge sites, along with ideas to spark your creativity. They’re fun, inspiring, and a wonderful way to get yourself creating today!
Happy Stampin’