Day 27 – Farmhouse Holiday: Ready to Jingle & Mingle

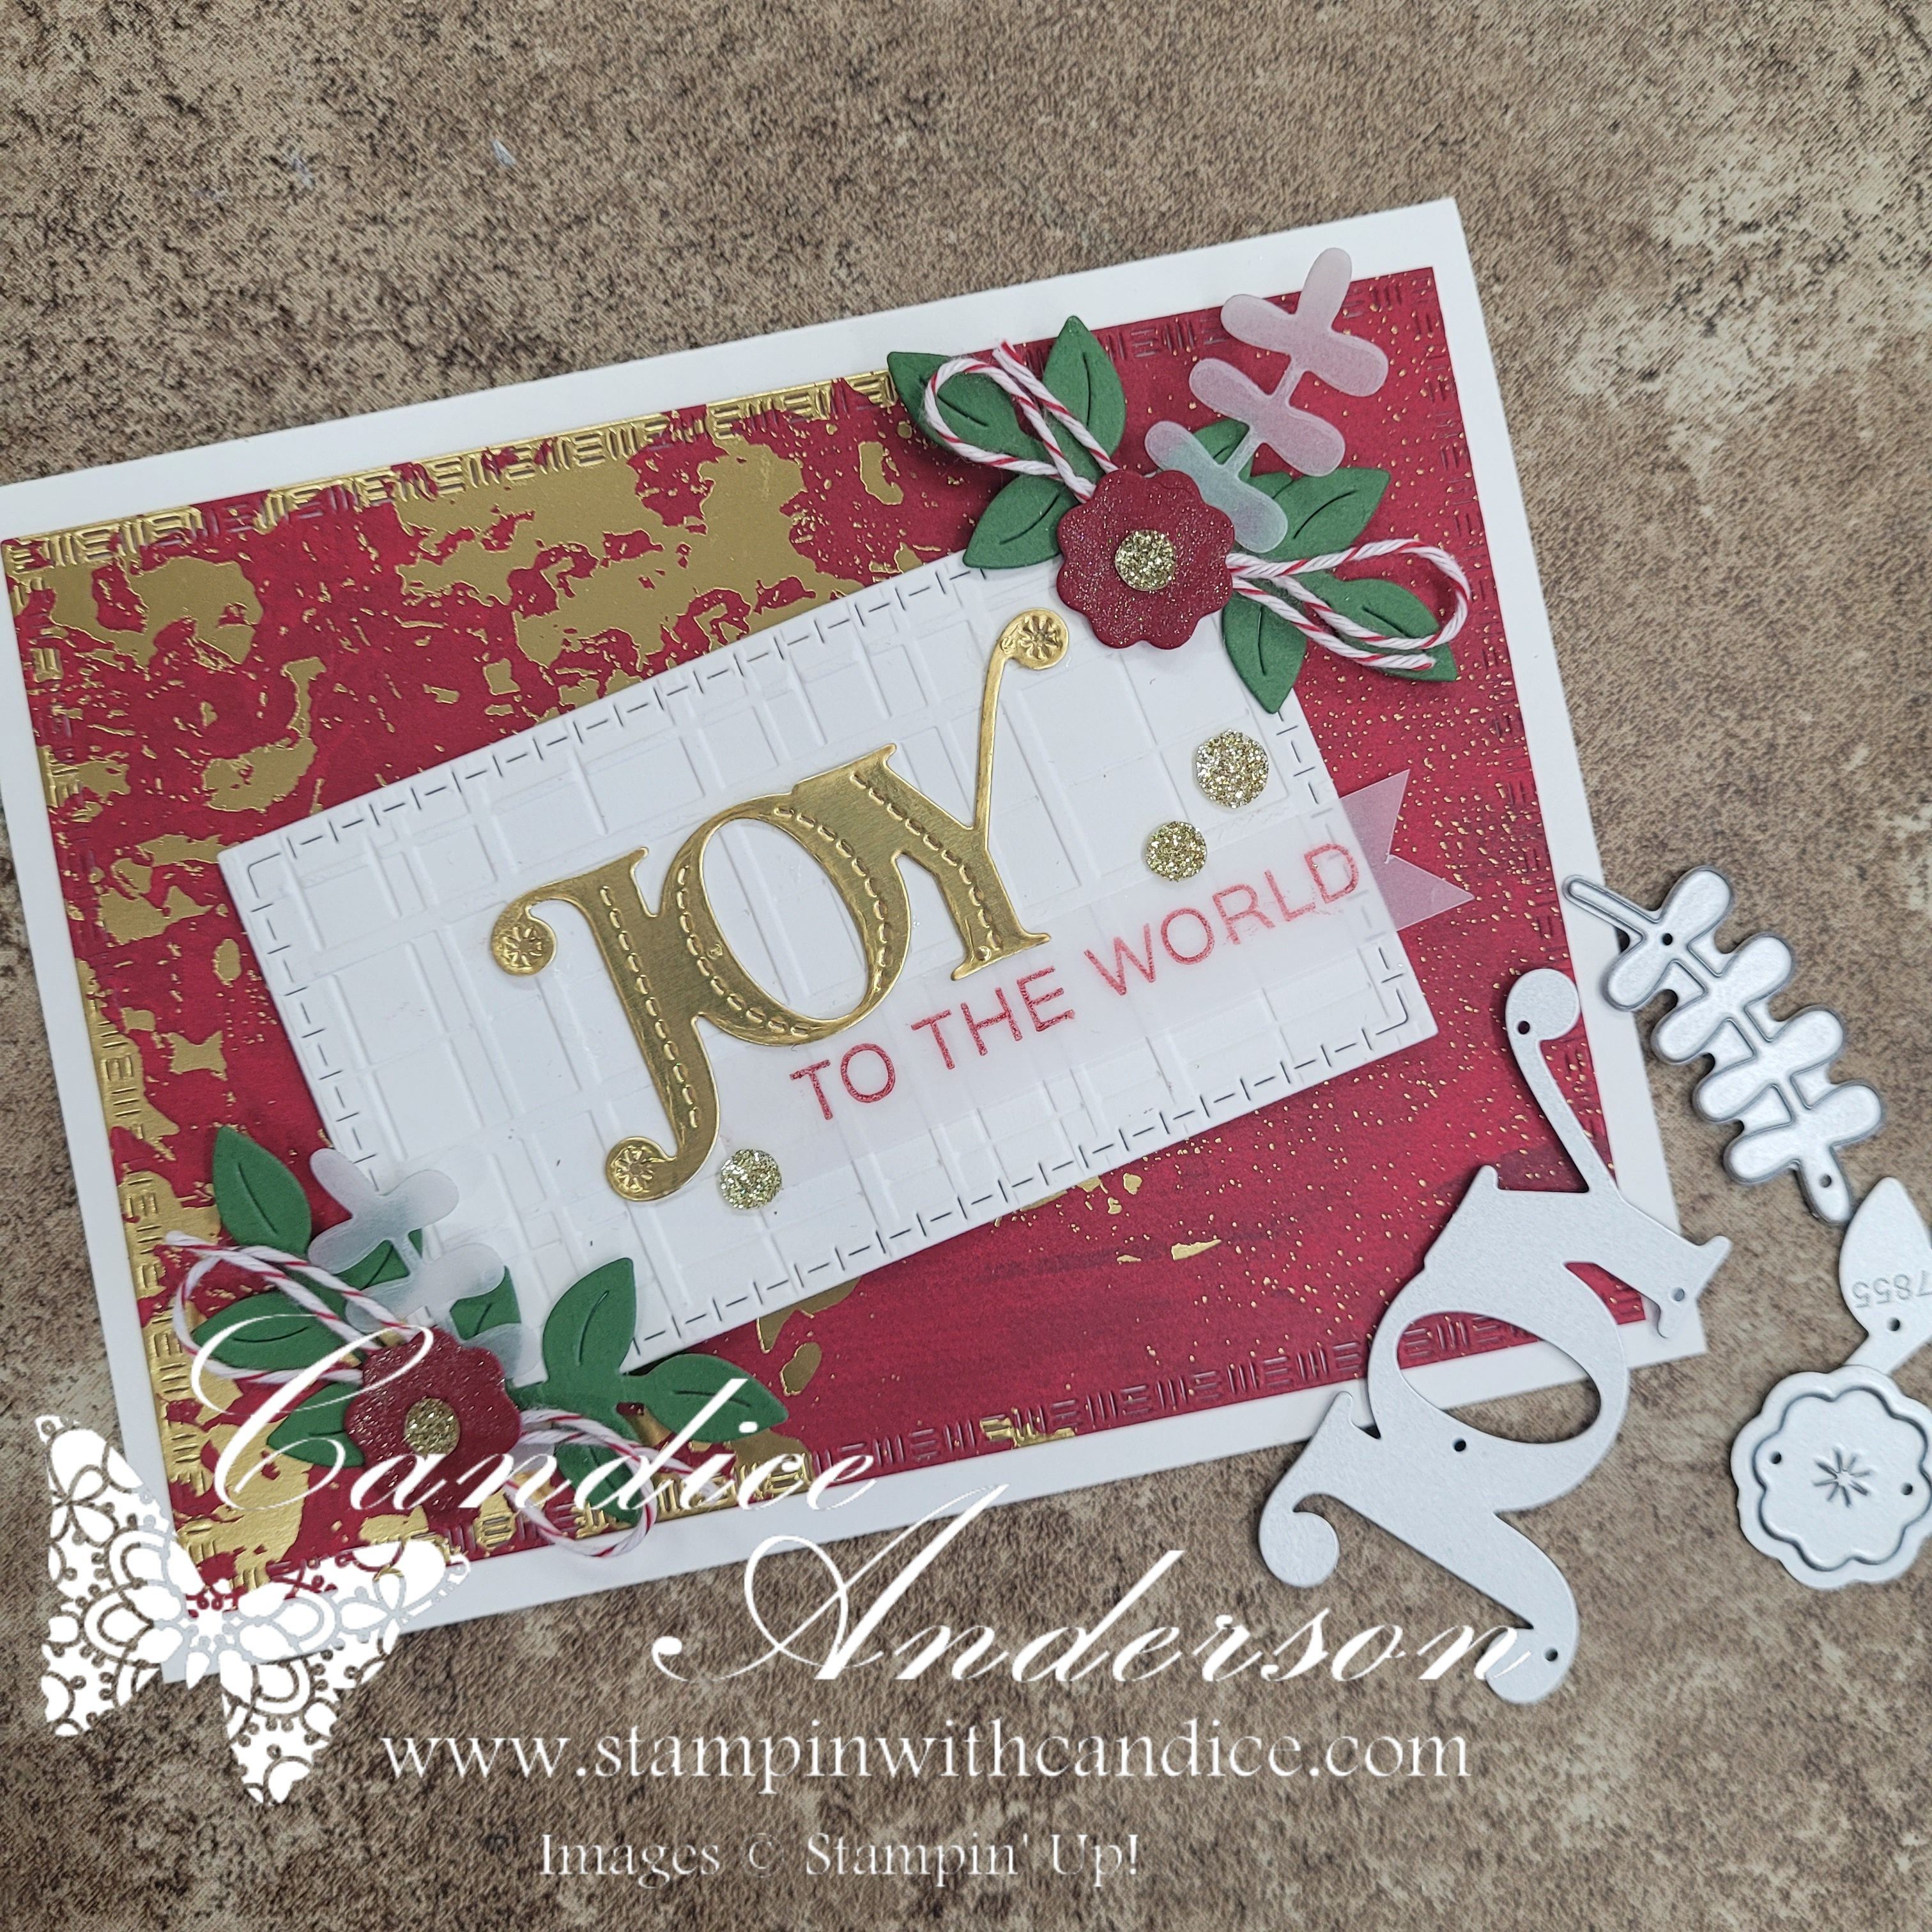
A Little Red Truck, a Christmas Tree, and the Perfect Thanksgiving Crafting Day

Happy Thanksgiving!
I honestly can’t think of a better way to celebrate than spending time doing what I loveβ€”crafting! And when today’s theme brought together Farmhouse Holiday + Jingle & Mingle, I knew exactly what I wanted to play with.

Because if you know me (or if you’ve ever stepped foot into my home during the holidays), you already know I’m obsessed with the little red truck hauling a Christmas tree. I have plenty of decorations to prove it! So when Stampin’ Up! released the Road to Christmas Kit (#166227), I knew immediately it was coming home with meβ€”and I’ve been saving it all month for today’s challenge.

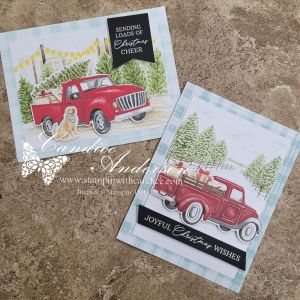
Of course, I started by making the cards exactly as instructed (because the kit is adorable!), but then I wanted to get creative. Today’s featured card is my all-out farmhouse holiday spin with one of my favorite fun elements…

A pop-up arch!

🚚❀️ Building the Pop-Up Arch Feature

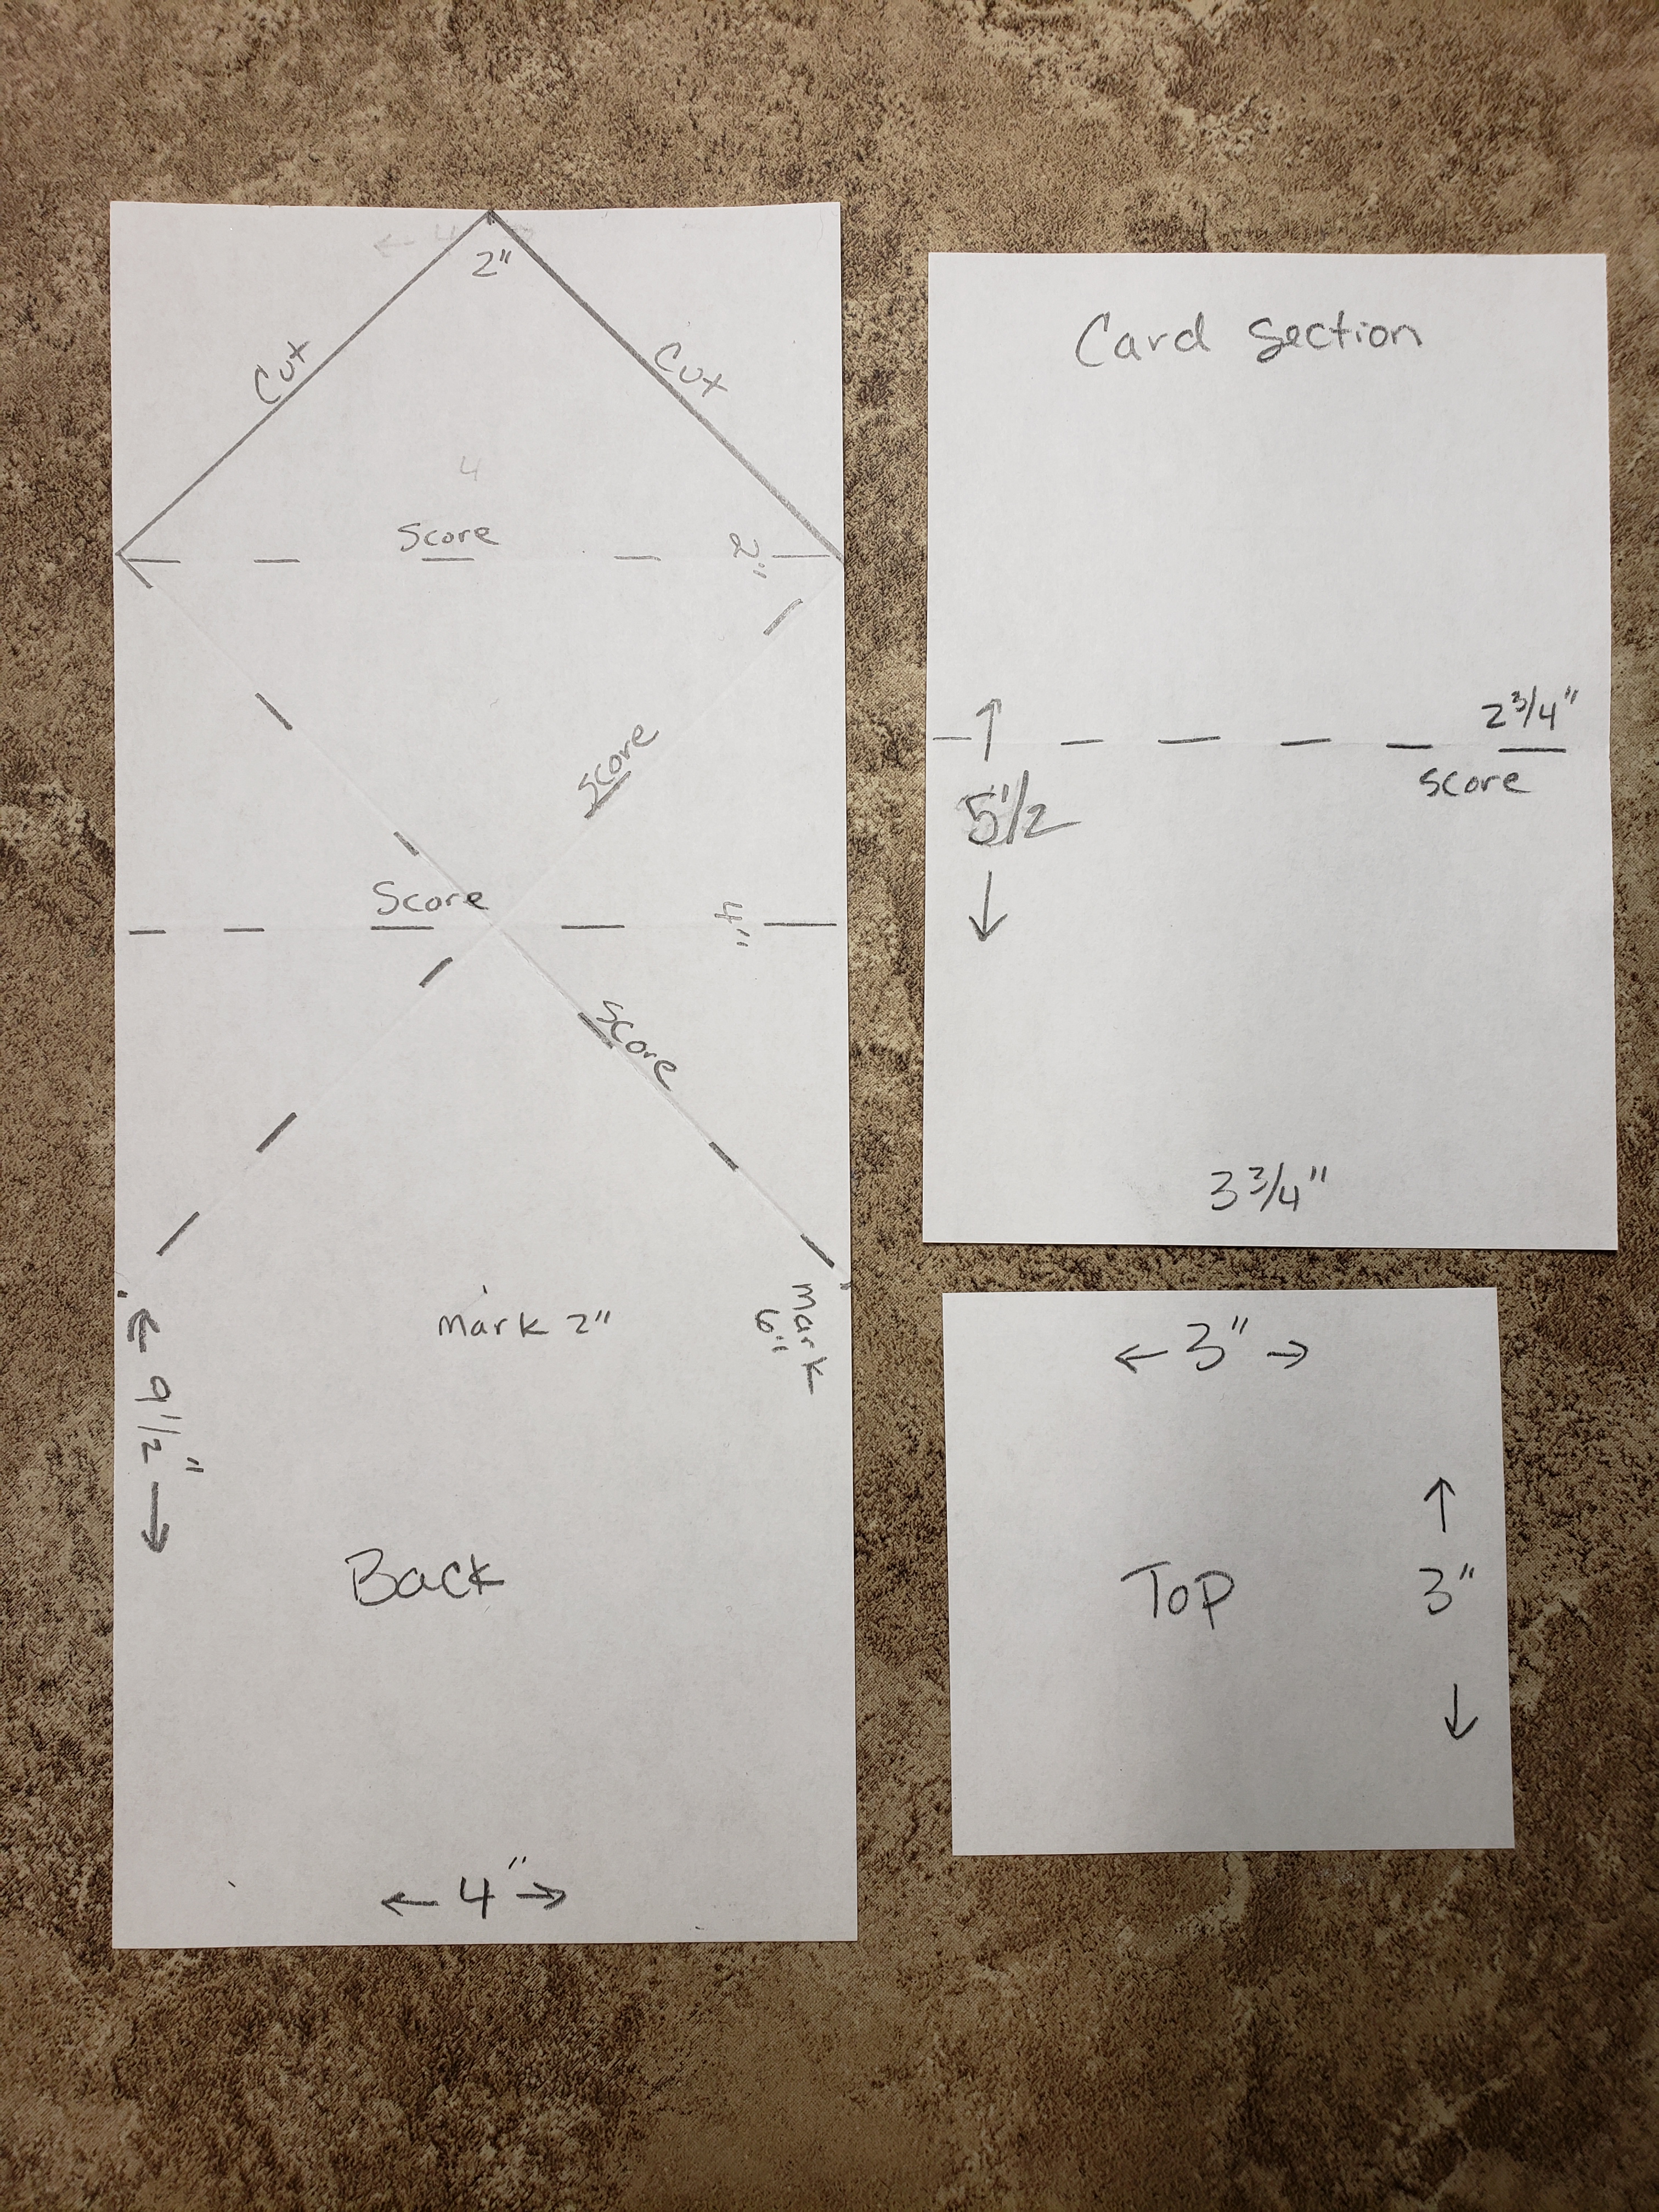
To transform the kit pieces into something extra special, I started with the Everyday Arches Dies (#164629).

Layered Arch Design

  • I cut the background piece from the kit using one of the arch dies.
  • Then I cut a slightly larger arch from kraft cardstock.
  • To create the pop-up mechanism, I folded a piece of kraft cardstock in half and cut the arch againβ€”but this time leaving the top edge just over the fold line, so it didn’t cut all the way through.
  • I scored the top of that folded arch at 2-1/2″.
  • Then I attached the full kraft arch to the lower part of the folded piece.
    This allows the entire arch to pop up beautifully when the card opens!

It adds such a fun, dimensional farmhouse feel.


πŸ“¨ Modifying the Kit Elements

πŸŽ„ Card Base Details

To build the card base:

  • I cut the card front from the kit in half.
  • Trimmed it to 5-3/8″ x 4-1/8″.
  • Mounted it on a Cherry Cobbler base cut to 5-1/2″ x 4-1/4″.

πŸ’¬ Sentiments & Envelope Magic

Instead of using the English phrases from the kit, I grabbed one of the greetings in a different language and layered my own sentiment on top using the Greetings for You Mix & Match Ephemera Pack (#166208).

Then I pulled out one of the kit envelopes (which are WAY too fun to use only as envelopes!). I cut it open and:

  • Trimmed the center to 5-1/4″ x 4″ for another project.
  • Used the leftover side strip as a perfect decorative layer behind my sayingsβ€”both outside and inside!

Tip:
You don’t need to put the entire strip behind the whole sentimentβ€”just enough to peek out. That allowed me to stretch the piece for both front and inside sentiments.

For the inside, I layered the sentiment on Cherry Cobbler and Lost Lagoon cardstock so the pop-up arch had something sturdy to catch on when standing.

A bit of red baker’s twine finished the front perfectly.

πŸŽ„ Quick, Easy, and Kit-Friendly

One fun thing to note:

There is NO stamping on this card!

Using the kit + ephemera + a few dies made this pop-up card fast, unique, and perfectly on-theme. This is exactly why I love Stampin’ Up!’s kitsβ€”they make it so easy to elevate a project with a few added touches.

❀️ What Do You Think?

I love how farmhouse and festive this turned outβ€”and that little red truck makes me happy every time I see it. If you’re a farmhouse Christmas fan too, you will love the Road to Christmas kit.

Would you try a pop-up arch card like this?

✨ Bonus Project!

Remember that extra piece I trimmed from the envelope? I couldn’t resist turning it into another card! I pulled out my beloved retired Trucking Along Set (#162299) and created a fun bonus project using that piece.

I love when a single kit piece inspires multiple cardsβ€”and this one came together so easily with that adorable little truck!

Want more details on how I created this bonus card?
Let me know, and I’ll be happy to post a full tutorial! πŸššπŸŽ„βœ¨

πŸ‘‰ Want to recreate it? You can shop current Stampin’ Up! supplies and tools here:
Shop with Me Here

A beautifully crafted Christmas card featuring a window scene that displays a peaceful nativity setting on one side, while the inside is adorned with cozy holiday elements like hanging stockings and warm colors.

Please feel free to contact me if you have any questions.

Contact me today to place your order!
435-232-2655 Cell ( Call or Text)
andersoncandice@hotmail.com


πŸ’• Let’s Stay Connected

πŸ“Ί YouTube
πŸ“˜ Facebook
πŸ“Έ Instagram
πŸ“Œ Pinterest

#StampinWithCandice #StamperCandi #ACardADayInNovember2025 #30DayChristmasCardMakingChallenge #ChristmasCards #HandmadeCards #CreativeTechniques #HolidayCrafting #cardmaker #cardmaking #christmascards #handmadecards #papercraft #StampinUpKits #christmaschallenge

Day 1 – Creative Christmas Cards with Paper Pumpkin Kits

For Day 1 of my Christmas card challenges, I decided to reach for my Paper Pumpkin kit! I love how quick and easy these kits make it to get crafty β€” especially when time is short and creativity is flowing.

Three crafted Christmas cards featuring traditional holiday designs, including an ornament with 'Deck the Halls,' a card stating 'Merry Christmas,' and one proclaiming 'Joy to the World,' adorned with festive decorations in red and green.

This month’s kit was the perfect way to jump into the holiday spirit with some traditional red and green cheer. I wanted to see if I could stretch the kit a little further, so I challenged myself to create one card that worked for both of my Christmas card challenges β€” plus fit the #GDP520 challenge, too!

To round it out I couldn’t resist adding in a fun scrapbook layout using some of the leftover pieces, too!

Here’s what I took on today:
✨ #ACardADayInNovember – Day 1: Traditional Red & Green Cheer
πŸŽ… #30DayChristmasCardMakingChallenge – Day 1: Merry and Bright Beginning
πŸ’š #GDP520 – CASE the Designer: Sue Mohr

It’s amazing how versatile these Paper Pumpkin kits are β€” you can create cards, tags, gift packaging, or even add them into your memory-keeping projects. My scrapbook page features the same theme as my card β€” bright pops of red and green, festive accents, and a cozy, cheerful vibe.

Paper Pumpkin is a monthly craft kit delivered to your doorβ€”perfect for quick, beautiful projects. Subscribe by the 10th to get next month’s kit

Promotional image for Paper Pumpkin kit featuring festive crafting supplies, including tags, treat boxes, and a Christmas stamp, all set against a green background.

If you haven’t opened your kit yet, this is your reminder: pull it out, play along, and see how far your creativity can go! βœ‚οΈβœ¨

If you’d like to join in the fun and play along check out my Facebook group for links to both groups.
And Remember to share your own creations β€” I’d love to see how you use your Paper Pumpkin this season! πŸ’Œ

This week’s project is my little tribute to a retiring favorite β€” the Beside Me stamp set. I used the #GDP490 layout as inspiration to create a heartfelt farewell card. Swipe to see how it turned out! #lastchancelist #stampinup #handmadecards

Please feel free to contact me if you have any questions.

Order online
Contact me today to place your order!
435-232-2655 Cell ( Call or Text)
andersoncandice@hotmail.com


πŸ’• Let’s Stay Connected

πŸ“Ί YouTube
πŸ“˜ Facebook
πŸ“Έ Instagram
πŸ“Œ Pinterest

Spooky Fun with Global Design Project #GDP511

This week’s Global Design Project challenge was all about using letters or numbers in our creations, and I couldn’t resist having a little spooky fun! πŸ‘»

I decided to make a playful Halloween card with a hidden surprise inside. On the front, I kept it creepy-cute with a mummy-style design, complete with googly eyes peeking out and bold letters spelling β€œBOO.” The little spiders and ribbon detail added just the right finishing touches.

But the real magic happens when you open the card! Inside, a bright and cheerful monster pops up, showing off big eyes, sharp (but friendly) teeth, and a touch of candy corn for good measure. It’s such a fun way to combine the challenge theme with a seasonal project.

That’s what I love about these challengesβ€”they push me to think outside the box and come up with designs I might not have tried otherwise.

Here’s a closer look at the details:

  • Front of the card: spooky letters + mummy bandages + spiders
    • #166191 Spooky Sweet 12 x12 Specialty Designer Series Paper
    • #166106 Fright Night Dies
    • #166103 Fright Night Stamp Set
    • #166203 Petunia Pop Iridescent Ribbon
    • #166202 Shimmer Star Foam Stickers
  • Inside: colorful monster made with die cuts and stamped background
    • #164629 Everyday Arches dies (face)
    • #166115 Tractor & Co Dies (hair)
    • #166191 Spooky Sweet 12 x12 Specialty Designer Series Paper (cutouts for nose and mouth)
    • #166106 Fright Night Dies (spider)
    • #159183 Stylish Shapes Dies (eye – inside)
    • #163580 Spotlight on Nature (eye – outside)
    • #162722 Trusty Tools (eye – center)
    • #166793 Sweet Halloween Stamp set (coming Sept 20205)
  • Theme tie-in: letters used both in the β€œBOO” and background sentiment
    • Colors used:
      • Basic black
      • Daffodil Delight
      • Granny Apple Green
      • Petunia Pop
      • Pumpkin Pie
      • Early Espresso
      • Pecan Pie
      • Crumb Cake
      • Very Vanilla

πŸ‘‰ Want to make your own spooky creations? You can order the products I used at www.candiceanderson.stampinup.net.

I had so much fun with this one, and I hope it inspires you to try a Halloween-themed card of your own! πŸŽƒπŸ•·οΈ

If you’d like to join in on this week’s challenge, head over to the Global Design Project and play along with #GDP511.

Please feel free to contact me if you have any questions.

This week’s project is my little tribute to a retiring favorite β€” the Beside Me stamp set. I used the #GDP490 layout as inspiration to create a heartfelt farewell card. Swipe to see how it turned out! #lastchancelist #stampinup #handmadecards

Order online
Contact me today to place your order!
435-232-2655 Cell ( Call or Text)
andersoncandice@hotmail.com

Fun Fold Graduation Card

If you are like me you’ll notice that it’s that time of year again and while I don’t have one of my own children graduating this year I have plenty of family and friends celebrating this awesome achievement. I wanted to create a unique card for them and loved how it turned out so much that I wanted to share it with you. I had actually seen this technique before and went searching for it. However; what I found wasn’t quite what I was looking for so I took what I found and tweaked it a bit to make it work for me.

You’ll notice that I have two different styles for you. The first set are the second ones that I made when I wanted to make ones that were more generic and to create a video for you. The first ones I made for my nephew and good friend who were graduating from Utah State University who just happen to have the colors of blue. I will say that the tassel was easier to make out of bakers twine than it was out of the gold cord. As I mention in the video the adhesive strips make this project a lot easier to apply the double layers of letters.

These are the measurements that I used when creating this card. I will mention that when I put the card in a regular size envelope it did end up just a tiny bit larger that the 5 1/2″ of a standard card, so you may want to trim it down to 9″ with the card section that opens to 5″. It did fit fine in a clear envelope though.

One of the cards I was giving away was for one of my employees and I wanted to have more room for people to sign the card for her. This was easily solved by attaching it to a regular card front. I stamped the front of the card before attaching the graduation card since you would be able to see the top corners. You could also use this technique and instead of having the section on the card open you can design something flat and then attach to a standard size card.

I hope you enjoy the video and please share it with your friends. If you have any questions or need additional information please feel free to contact me. Remember you can purchase any of the items you’ve seen by going to my website at www.candiceanderson.stampinup.net.


Please feel free to contact me if you have any questions.

Order online
Click on the shop now button.
Contact me today to place your order
or book your party!
435-232-2655 Cell ( Call or Text)
andersoncandice@hotmail.com Please feel free to contact me if you have any questions.

Warm Welcome Bundle

Can you believe this is my last retiring stamp set. Tomorrow I will have a few more projects to share but this is the last stamp set that I had to use. I really struggled with coming up with ideas for this set. I actually combined two different samples from the mini catalog where it’s found. I also added in a new in color.

  • 160704 – Warm Welcome Bundle (R) (M)
  • 160698 – Warm Welcome Stamp St (R) (M)
  • 160703 – Warm Welcome Dies (R) (M)
  • 159177 – Brushed Shapes Dies (R)
  • 151193 – Champagne Rhinestone Basic Jewels (R)
  • 161598 – Basics Embossing Folders (O)
  • 160597 – Three Twine Combo Back (R) (M)
  • 153524 – Brushed Metallic Cardstock (R)
  • 160839 – Bellum Basics (C) (M)
  • Colors – Basic White (C), Costal Cabana (C), Pecan Pie (N)

(R) Retiring, (C) Carrying Over, (O) Online Exclusive, (M) Found in the Mini Catalog, (N) Found in the new 2023-2024 Catalog


Please feel free to contact me if you have any questions.

Order online
Click on the shop now button.
Contact me today to place your order
or book your party!
435-232-2655 Cell ( Call or Text)
andersoncandice@hotmail.com Please feel free to contact me if you have any questions.

More Samples

Don’t you hate it when you make samples intending to share them and run out of time only to have some of the products on them end up in the retired list. Well that’s what this post is all about. The stamp sets may not be retiring and you may even find some of the punches and dies aren’t either, but something on them is. Because many of the items will be carrying over I’m just going to list the stamp set or bundle, the retiring item, and the for each sample. If you would like more specifics on a sample please feel free to comment or reach out and I will be happy to share.

Irresistible Blooms Bundle

I enjoyed playing with this new bundle that is and online exclusive. I used the emboss resist technique with the water color brushes to create the flowers and leaves.

  • 161150 – Irresistible Blooms Bundle (O)
  • 159194 – Rose Gold & White 5/8″ Striped Ribbon (R)
  • 155780 – Soft Succulent 3/8″ Open Weave Ribbon (R)
  • Colors – Lost Lagoon (N), Pretty Peacock (N), Flirty Flamingo (C), Soft Succulent (R), Basic White (C)
  • Colors – Smoky Slate (C), Pear Pizzazz (R), Flirty Flamingo (C), Basic White (C)

Country Bouquet Bundle

I actually got the idea for this card when I created a topper for my Christmas tree. Yes, I said Christmas tree. I’m a little weird and hate how dark it is when taking down the tree in January so instead we re-decorate it for Valentine’s day and leave it up long enough for the days to get longer again and bring in the light. I found a cool red heart for the top and wanted to add something to it so I made the center part that says love on it to attach to the side of the heart. Since the heart was hollow I added a stamped background this became the inspiration for the background for my card with the same focal point that I used on my tree topper. To add the sparkle to the strip to the background on the card I covered the entire section with clear embossing powder.

  • 160383 – Country Bouquet Bundle (R) (M)
    • Individual items will be carrying over
  • 156408 – White 3/8″ Glittered Organdy Ribbon (R)
  • 159190 – Heart Pearls (R)
  • 151770 – Layering Circle Dies (R)
  • Colors – Real Red (C), Garden Green (C), Blushing Bride (R), Pear Pizzazz (R), Basic White (C)

Country Gingham 6×6 DSP

I have seriously fallen in love with this DSP and though it’s leaving I’m excited that there is something similar in the new catalog. Once again I created these a while ago and never shared them. Both the stamp sets and dies are carrying over but the paper sadly is not so I wanted to share them while I could.

  • 160388 – Country Gingham 6×6 Designer Series Paper (R) (M)
  • 160383 – Country Bouquet Bundle (R) (M)
    • Individual items will be carrying over
  • 160396 – Share a Milkshake Bundle (R) (M)
    • Individual items will be carrying over
  • Colors – Mint Macaron (R), Sweet Sorbet (C), Crumb Cake (C), Petal Pink (C), Balmy Blue (C), Soft Suede (R), Basic White (C)

Enjoy the Rhythm

How fun is this card. You are probably thinking that the stamp set is what I’m listing as retiring but surprisingly that is not the case. In fact the only thing on this card that is retiring is the circle die. Although you could probably use another of the stitched circles if I remember correctly it was slightly smaller which is why I didn’t use it. As I’ve mentioned before my husband loves the color combo of purple and green and another fun thing about him is he plays the drums so once again I was inspired by him when I created this card. I’m excited that this stamp set is carrying over as I think it will be fun to create more projects with it.

  • 151770 – Layering Circle Dies (R)
  • 160361 – Enjoy the Rhythm Stamp Set (C) (M)
  • Colors – Parakeet Party (C), Highland Heather (C), Basic White (C)

(R) Retiring, (C) Carrying Over (O) Online Exclusive, (M) Found in the Mini Catalog, (N) Found in the new Catalog available May 2, 2023

Time is running out and you only have a few more days left to place an order for your favorite retiring items before they are gone for good. Make sure to use the special hostess code in the right hand column when placing your order. I hope you have enjoyed all the samples I have shared with you. I have just two more days of fun projects featuring retiring items and then I will be jumping into more projects featuring new and carrying over projects. Thanks so much for your support and please take a minute to comment and share. I love hearing from you and appreciate when you enjoy my work enough to share it with others.


Please feel free to contact me if you have any questions.

Order online
Click on the shop now button.
Contact me today to place your order
or book your party!
435-232-2655 Cell ( Call or Text)
andersoncandice@hotmail.com Please feel free to contact me if you have any questions.