Creative Card Making with Happy Place Stamp Set

Last night’s project was so much fun to share! πŸ’• I’ll admitβ€”I had a couple of little mishaps along the way, but hopefully if you watched, you still loved this fun and creative idea. Sometimes those little hiccups make crafting even more real and relatable. 😊

I shared several projects using the Happy Place stamp set #165966, and I loved exploring different ways to bring this set to life.
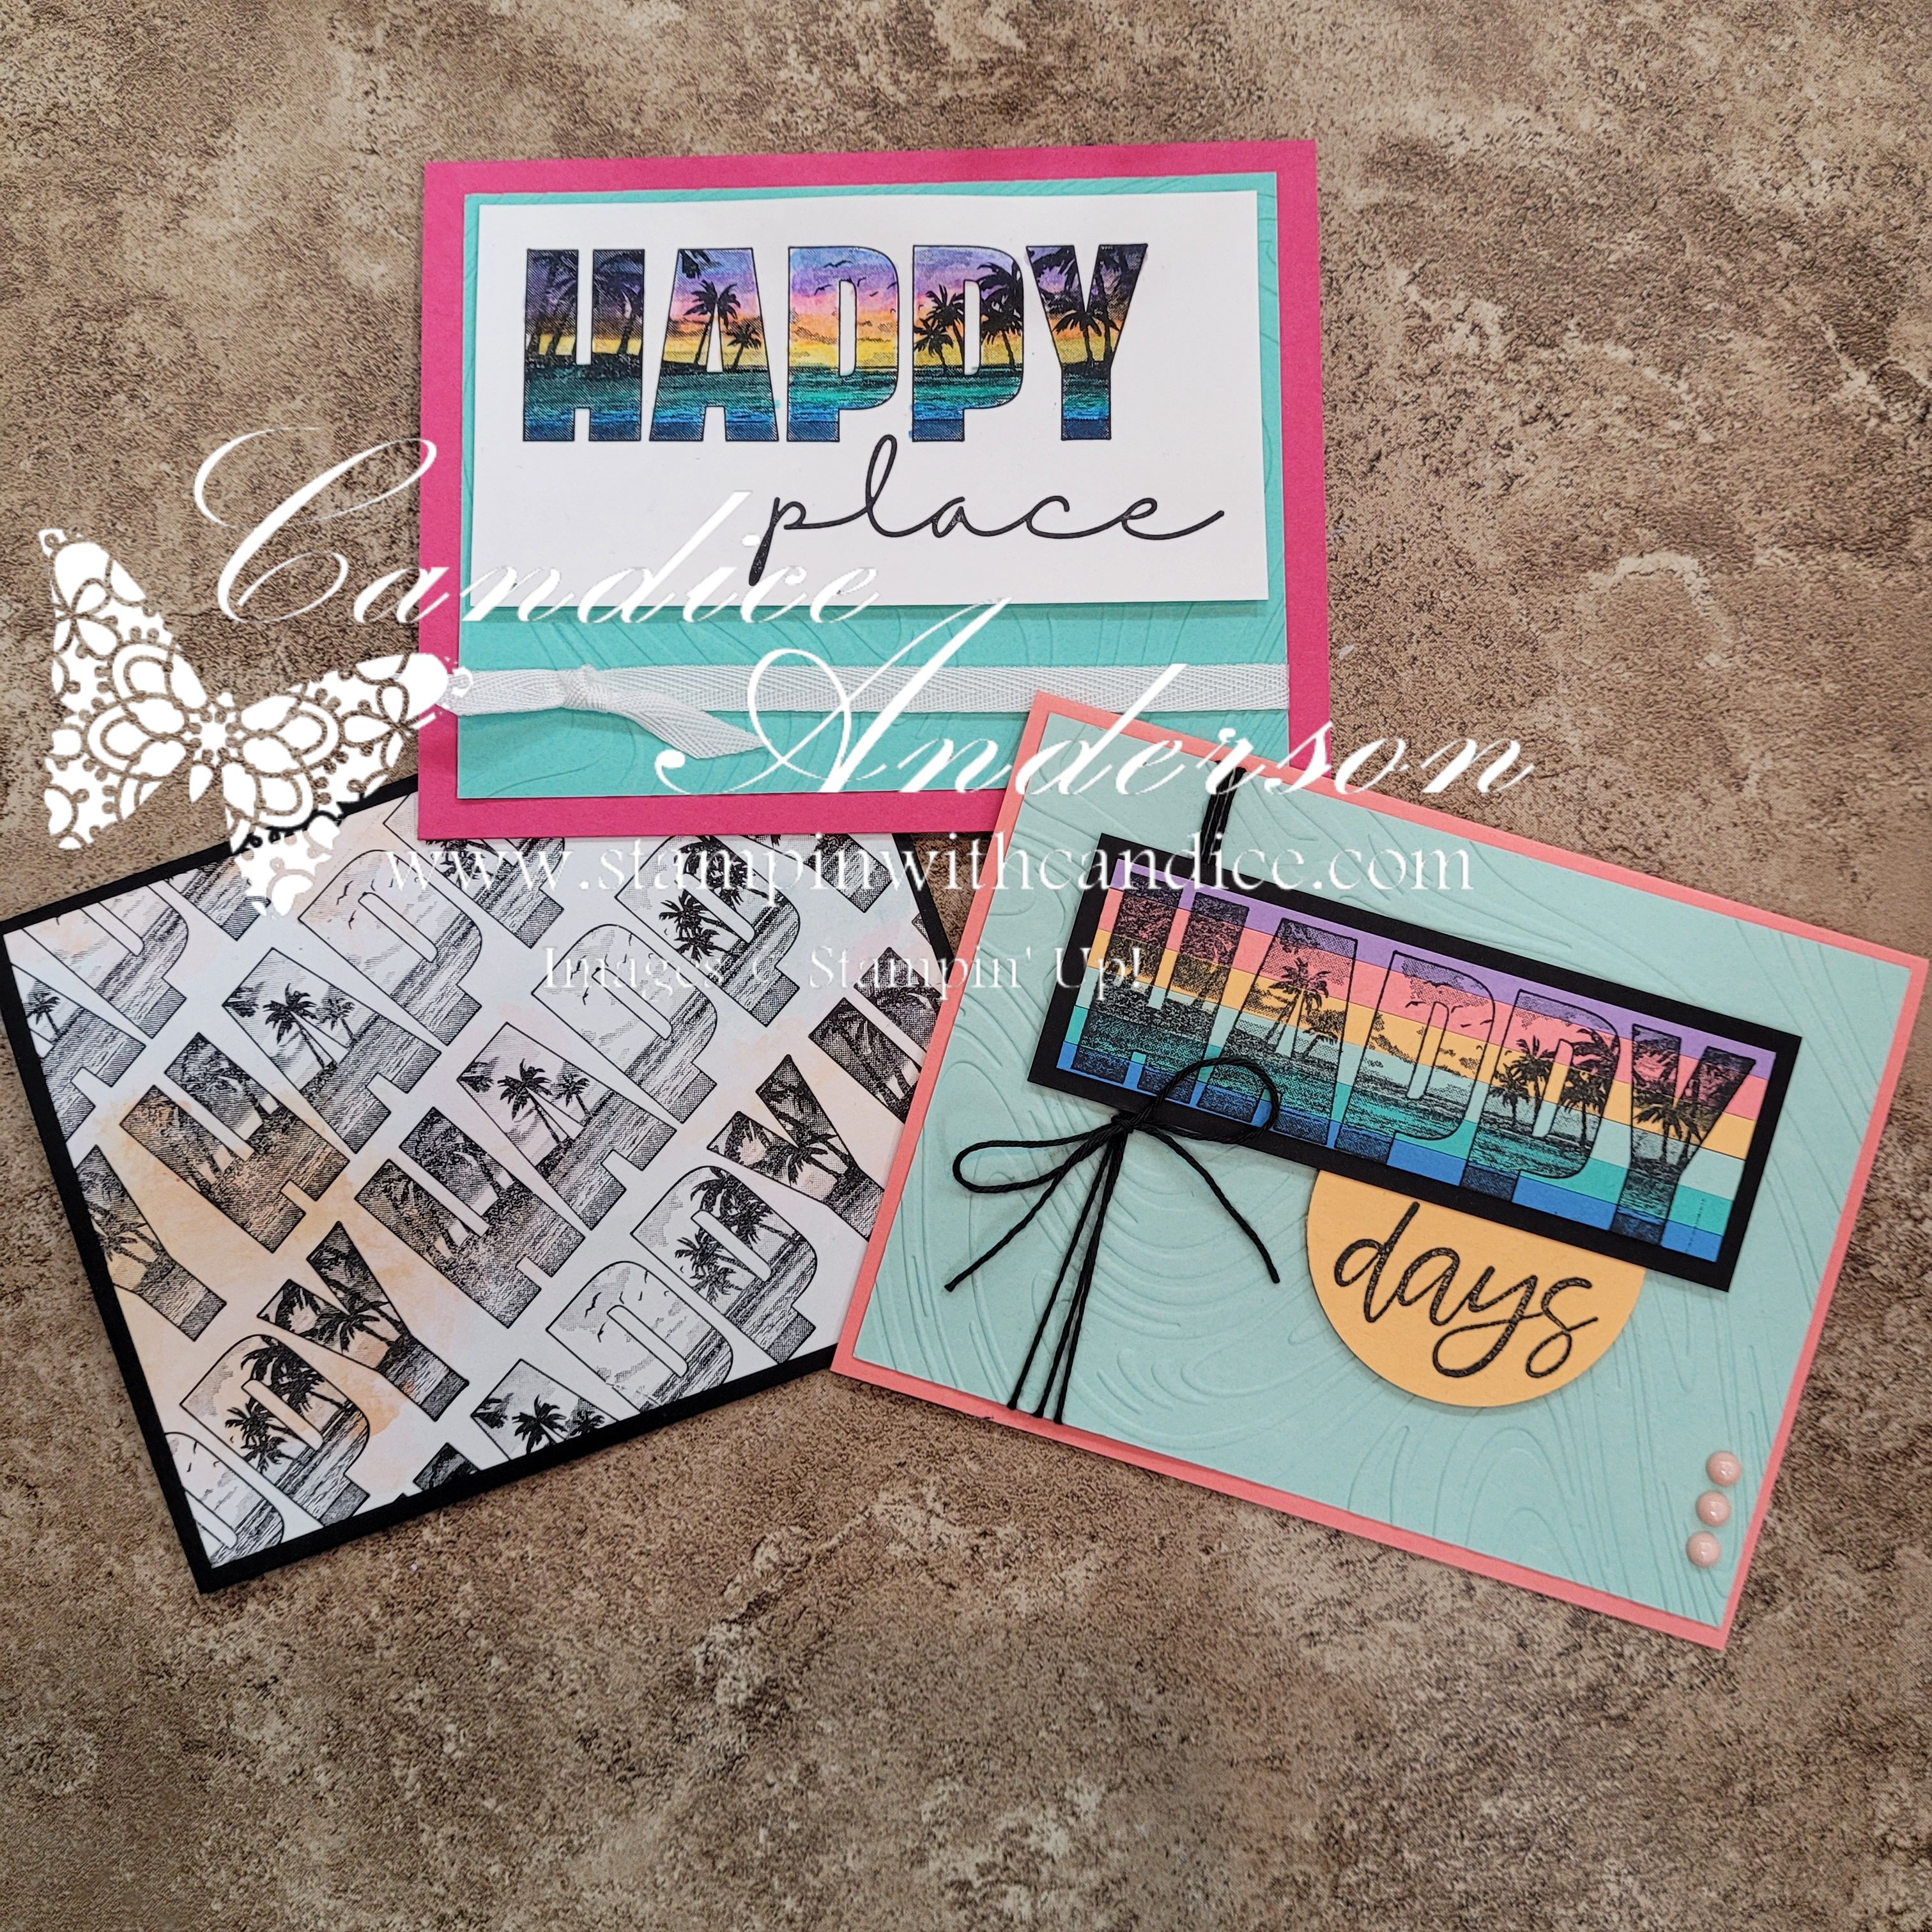
Three handmade greeting cards featuring colorful designs. One card says 'HAPPY place' with a beach scene in the letters, another card features the phrase 'HAPPY days' with a similar theme, and the third card has a black and white pattern of palm trees.

✨ Project 1:
I showed how to color the images using Watercolor Pencils #149014 with Water Painters #168253. Quick tip: I first tried this on watercolor paper, but I don’t recommend it for this technique. I got a much clearer stamped image when I used white cardstock instead.
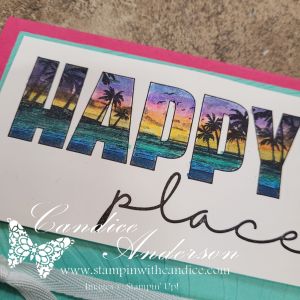
✨ Project 2:
For the second card, I kept things super simple by stamping directly onto the Beach Boardwalk DSP #166820. This made for an easy, clean design with very little effort.

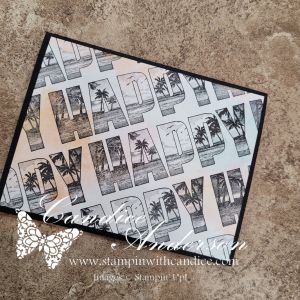
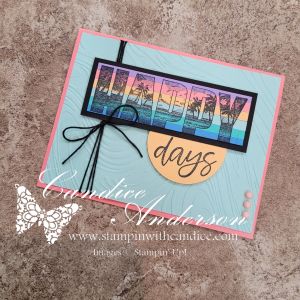
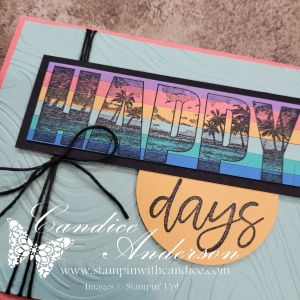
✨ Project 3 (Step-by-Step):
For my final card, I walked through the process of creating a multicolor background using paper instead of coloring.
Here’s how it came together:

  • I applied Adhesive Sheets #152334 to cardstock
  • Cut ΒΌ” strips of different colors and lined them up
    • Highland Heather
    • Flirty Flamingo
    • Peach Pie
    • Pool Party
    • Summer Splash
    • Azure Afternoon
  • Trimmed the panel to size and stamped the image in black
  • Used the 2″ Circle Punch #133782 for the β€œdays” sentiment
  • Finished it off with the So Swirly Embossing Folder #163791, Black Baker’s Twine #155475, and Muted Palette Dots #165155

This technique gives a similar look to coloringβ€”but without picking up a pencil!

I hope these projects inspire you to take another look at the Happy Place stamp set and try something new.

To see how I created it check out the full video.

πŸŽ‰ Bonus Days Reminder:

  • Spend $50 before February 2nd and earn $5 to redeem next month
  • Spend $75 and grab the Product of the Month for just $5

Thanks so much for crafting along and shopping with meβ€”I appreciate your support more than you know! πŸ’–


πŸ‘‰ You can shop current Stampin’ Up! supplies and tools here:
Shop with Me Here

A beautifully crafted Christmas card featuring a window scene that displays a peaceful nativity setting on one side, while the inside is adorned with cozy holiday elements like hanging stockings and warm colors.

Please feel free to contact me if you have any questions.

Contact me today to place your order!
435-232-2655 Cell ( Call or Text)
andersoncandice@hotmail.com


πŸ’• Let’s Stay Connected

πŸ“Ί YouTube
πŸ“˜ Facebook
πŸ“Έ Instagram
πŸ“Œ Pinterest

Hello Sunshine & Travel Dreams βœˆοΈπŸŒž

Did you know that today is National Shop for Travel Day?
That feels perfectly timed because my future travel plans include a Caribbean cruiseβ€”and after almost two years of planning, I’m finally down to under 100 days! πŸŽ‰

With travel on the brain, it felt only right that during my live yesterday I featured the Beach Boardwalk Suite. This collection also has a coordinating scrapbooking kit, and I can hardly wait to use it to document our trip once we return. πŸŒŠπŸ“Έ

For this project, I used the Global Design Project #GDP530 layout challenge as my starting point. I pushed myself a little out of my comfort zone and treated the layout more as inspiration rather than a strict roadmapβ€”which is definitely not my norm!

Two colorful greeting cards featuring a beach scene with palm trees, a large sun, and the text 'HEY, SUNSHINE'. The background has soft pastel colors and textured layers.

Design Inspiration & Creative Changes

Logo of the Global Design Project featuring a globe icon with a heart, accompanied by the text 'GLOBAL DESIGN PROJECT' and the hashtag '#GDP530'. Below is a simple design with circular shapes in green and white, set against a light green background.

One of the main elements in the challenge layout is three circles on the side. Instead of circles, I swapped them out for three palm trees, keeping the visual balance while adding a fun tropical twist. 🌴🌴🌴

I also decided to turn this into a slimline card, which is one of my favorite formats. This size fits perfectly in a legal-size envelope, making it great for mailing or gifting.

Card Size & Base

While there are many slimline sizes, I typically make mine 8-1/2″ x 3-1/2″. I also love turning them into pocket cards for money or gift cards.

  • Card base: 8-1/2″ x 8-1/2″, scored at 3-1/2″ and 7″
  • Card base color: White

Background & Layers

I cut a second piece of white cardstock to 8-1/4″ x 3-1/4″ and used my blending brushes with Strawberry Slush, Petunia Pop, and Pool Party to create a soft ombre background.

For the square focal element, I cut a piece of Beach Boardwalk DSP #166820 using the largest square from the Stylish Shapes Dies #159183 and framed it with a 3″ x 3″ piece of cardstock:

  • Card 1 frame: Strawberry Slush
  • Card 2 frame: Petunia Pop

Want to see all the steps come together?
Be sure to check out the replay from my live, where I walk you through the entire process and share extra tips along the way. πŸŽ₯✨

Stamping & Die Cutting Details

Two hand-crafted greeting cards featuring a watercolor background with pink and blue tones, silhouettes of palm trees, and a yellow sun.
  • Palm trees stamped from Boardwalk Fun Stamp Set #166822 in Petunia Pop on the DSP
  • Additional palm trees die cut in black cardstock using Boardwalk Fun Dies #166828
  • I layered two of them over the stamped palm trees to create a shadow effect.

For the sun, I used one of the stitched circle dies (third smallest) cut from white cardstock and blended Daffodil Delight and Timid Tiger for added depth β˜€οΈ.

Sand, Waves & Finishing Touches

  • Sand: Torn Crumb Cake cardstock, stamped with dots from Swirled Designs #167030 in Pecan Pie, then softly blended for dimension
  • Waves: DSP cut with Light & Wonder Dies #165762, edges highlighted with Pool Party ink

I stamped β€œHey, Sunshine” in black ink in the bottom right corner and wrapped Strawberry Slush Ribbon around the ombre background before assembling everything.

The palm trees were popped up with Stampin’ Dimensionals, and I finished them off with a simple knot secured using Mini Glue Dots. A few Strawberry Slush & Pretty in Pink Gems #165615 added just the right amount of sparkle ✨.

Inside Pocket

A colorful greeting card design featuring palm trees and a sun, with the text 'HEY, SUNSHINE'. The card is partially open, revealing a two-dollar bill inside.

On the inside, I added a strip of DSP to the top of the 1-1/2″ folded section and used Tear & Tape on the sides to create a pocketβ€”perfect for cash or a gift card.

This bright, happy card has me so ready for warm weather and sunshine, especially while we’re still in the middle of winter β„οΈβž‘οΈβ˜€οΈ.

πŸ’¬ Tell me:
What trip are you dreaming of taking this year? And can you see yourself using the Beach Boardwalk Suite for your summer plans?

If so, be sure to add this amazing suite (and all the fun extras!) to your cart today. πŸ›’πŸŒ΄
If you enjoyed this project, remember to click follow so you’ll be notified when I share more creative inspiration and upcoming projects.

Thanks so much for stopping byβ€”I truly appreciate you! β˜€οΈβœ¨


πŸ‘‰ You can shop current Stampin’ Up! supplies and tools here:
Shop with Me Here

A beautifully crafted Christmas card featuring a window scene that displays a peaceful nativity setting on one side, while the inside is adorned with cozy holiday elements like hanging stockings and warm colors.

Please feel free to contact me if you have any questions.

Contact me today to place your order!
435-232-2655 Cell ( Call or Text)
andersoncandice@hotmail.com


πŸ’• Let’s Stay Connected

πŸ“Ί YouTube
πŸ“˜ Facebook
πŸ“Έ Instagram
πŸ“Œ Pinterest

Adventure Awaits

It’s been a while since I’ve created a scrapbook page but I had this idea while I was doing some training at my new job. Have you ever gotten and idea from a project from somewhere kind of unusual? During the training they kept showing a picture and then drawing a line from the picture to create a rectangle. My mind immediately thought it would make a great card front or accent for a scrapbook page. As I mentioned the other day my family loves to be outdoors and I fell in love with the Campology stamp set wanting to use if for scrapbook pages. When I started creating this project I was drawn to the Greatest Journey Dies that I showcased early. I enjoyed combining the Enjoy the Journey Suite with the Campology Stamps to create this fun scrapbook layout. Now I just need to go camping so I can add some pictures.

I thought that I would give you a close up of some of the details on the page. Rather than cutting out the letters and placing them on the cardstock I actually did the reverse and lined them up and cut them out using the cutout as my header. I used some old washi tape to hold them in place so they didn’t move as I was cutting them out. The advantage to this technique was that I didn’t have to worry about attaching a bunch of small pieces to my project.

I really love how the accent pieces turned out. I think I may create more projects using this outline technique. It was simple to create using a ruler and our stampin’ write markers. I also used black to add shadow to some of the images as a way to incorporate the black accessories I wanted to use from the suite. I finished it off by using accents from the greatest journey suite including some of the awesome designer series paper which is where I pulled my color scheme from.

  • 152553 – Campology Stamp Set (R)
  • 160588 – Greatest Journey Stamp Set (R) (M)
  • 160594 – Greatest Journey Bundle (Stamp and Dies) (R) (M)
  • 160599 – Enjoy the Journey Suite Collection (R) (M)
  • 160597 – Three Twine Combo Pack, Garden green, Coastal Cabana (R) (M)
  • 160598 – Enamel Sticker Icons – (R) (M)
  • 160586 – Enjoy the Journey 12 x 12 Designer Series Paper (R) (M)
  • 160750 – Alphabet A la Mode (C) (M)
  • 104199 – Linen Thread (C)
  • Colors – Coastal Cabana (C), Garden Green (C), Crumb Cake (C), Basic Black (C), Basic White (C)

(R) Retiring, (C) Carrying Over, (M) Found in the Mini Catalog

When I started this project I originally used the colors Shaded Spruce and Very Vanilla, but then I ended up deciding to use elements from the Enjoy the Journey Suite and the Designer Series Paper used slightly different colors. Rather than let my original focal image go to waste I turned it into a quick card adding in additional embellishments and words from the suite.


Please feel free to contact me if you have any questions.

Order online
Click on the shop now button.
Contact me today to place your order
or book your party!
435-232-2655 Cell ( Call or Text)
andersoncandice@hotmail.com Please feel free to contact me if you have any questions.

Greatest Journey

Have you ever fallen in love more with the dies than with the stamp set?

That is how I felt when I first saw this suite. It was the dies that drew me to them. Maybe because my family is very outdoors and we love to camp, hike and bike and I thought these would be perfect to make cards for them and scrapbook pages. When I started to play with this stamp set I really wanted to use the blending brushes in a unique and different way. I chose to use the dies to cut out a template that I held to create a layered effect on the card. Rather than having a blended look by using the template I was able to create depth to the background without adding more layers. I finished it off by layering cardstock that I embossed the saying on with white embossing powder and the used one of the die cut images as a focal point.

I originally created this card as a swap with my Stampin’ Up! team and I’m happy to report that I was one of the winners of the swap with this card. Here is a close up picture where you can see the detail better.

After creating the card for the swap I decided I wanted to see what I could come up with using some of the other images and sayings in the set. Here’s what I came up with. What do you think? I still like the first one the best, but I like these as well. I know I’ve said this before, but I’m sad this one didn’t carry over from the mini catalog as I think it’s a great set and I love the dies.

  • 160588 – Greatest Journey (R) (M)
  • 160593 – Greatest Journey Dies (R) (M)
  • 160594 – Greatest Journey Bundle (R) (M)
  • 160597 – Three Twine Combo Pack, Pumpkin Pie, (R) (M)
  • 160518 – Small Blending Brushes (C) (M)
  • 153611 – Blending Brushes (C)
  • 160519 – Blending Brush Storage (C) (M)
  • 155554 – Stampin’ Emboss Powders, White, (C)
  • 129053 – Heat Tool (C)
  • 147277 – Craft Stampin’ Ink, White (C)
  • Colors – Mango Melody (R), Cajun Craze (C), Orchid Oasis (C), Highland Heather (C), Starry Sky (C), Basic Gray (C), Basic Black (C), Basic White (C)

(R) Retiring, (C) Carrying Over, (M) Found in the Mini Catalog


Please feel free to contact me if you have any questions.

Order online
Click on the shop now button.
Contact me today to place your order
or book your party!
435-232-2655 Cell ( Call or Text)
andersoncandice@hotmail.com Please feel free to contact me if you have any questions.

Covention Swaps 12 x 12 group 1

Sorry I’ve been missing in action we’ve had internet problems and I’ve had camera issues, but I’m back and with some fabulous swaps form convention. The last group I did was 12 x 12 pages. There were actually two group for this one. Because there are so many I’m going to break them up in 4 groups. So enjoy!

There is no particular order here and I will try and let you know who did each one (hopefully they are all marked.)Β  Thanks again to everyone who participated all of the pages are great.Β Β  I’ve already used some for Club and I’m looking forward to adding pictures to them.

First up is mine.Β  I used the awesome Awash with Flowers Set.Β  It’s hard to tell but the flowers are done with a fun technique that gives you a water color look even though it’s a solid stamp.

Awash with Flowers
#117063 Wood $39.95
#120549 Clear $ 27.95

Word Play
#120308 Wood $41.95
#120651 Clear $28.95

#117163 Elegant Soiree DSPΒ  $9.95

Is this page just cute or what.Β  I love it.Β  It was created by Shelly May.Β  I love the colors and the overall layout.Β  Plus how cute is the cogs punch.Β  I’m so glad that they put it in the catalog.

#117164 Celebrations DSPΒ  $9.95

#118873 Cogs Extra- large Double Punch $17.95

# 111550 Sock MonkeyΒ  $26.95

More Monkey Accessories
#116962 Wood $16.95
#120468 Clear $12.95

Party this way
#118744 Wood $15.95
#120609 Clear $11.95

This page is so fun and so cute.Β  In fact I used it for club last month.Β  With just one change.Β  Her cute sand is actually made with real sand paper.Β  I created it with the awesome log cabin spray.Β  I just love all the fun punch art on this page as well.Β  It was created by Natalie Cottle.

Punches used:
#119856 Β  Scallop OvalΒ  $16.95
#119856Β Β  1-1/4″ SquareΒ  $15.95
#119850 1-3/4″ CircleΒ  $16.95
#119869 1/2″ CircleΒ  $5.95
#119872 Spiral Boarder $15.95

#119871 3/16″ Corner $6.95

Can I say I’m in love.Β  This page is adorable.Β  It was made by Melanie Williams and she would say it’s a little Cheese.Β  I would have to agree.Β  The cheese is so cute I love how easy it is to make just using all of our different circle punches.Β  Plus doesn’t the hamburger just look good enough to eat.Β  She even added texture to the bun by using the Perfect Polka Dots Embossing Folder.

#117335 Perfect Polka Dots $7.95

On the Grill
#116970 Wood $23.95
#120474 Clear $17.95

The last fun page for today was created by Deanne Henderson.Β  I love how simple it is yet very I catching.Β  There’s so much detail in all the flowers.Β  Off course they were created with our great punches again.Β  What you can’t see very well is the fun Rhinestones in the center of the small flowers.Β  With 150 per package it’s so easy to add fun bling to your page.

#119246 Basic Rhinestones $4.95

#119831 Sunny Garden DSP $9.95

#117158 In Color Patterns DSP Stack $19.95

Punches:
#118874Β Β  2-3/8″ Scallop Circle $16.95
#119854Β  1-3/4″ Scallop Circle $16.95
#119858 Β  Boho Blossoms $16.95
3119868Β Β  1″ Circle $10.95

Hope you enjoyed them and were inspired by all the great talent.Β  Come back soon to check out the other three groups.

Check out My Header

Hopefully you noticed the fun new header I added today.Β  I created it using the new “My Digital Studio.”Β  This program is so much fun and so easy to use.Β  You can use it to make scrapbook pages, books, cards, calendars, DVD’s and so much more.Β  You will love it.Β  It’s packed full of all our great colors, lots of accessories and stamp sets to use.Β  Plus there will be downloads available to add later.Β  You can print your own projects or have them printed through our professional print services.Β  At just $79.95 this product is a steal.Β  It will be available for customers October first.

My Boys Camping Pg 2009Want to save a little.Β  Here’s two great ways.Β  Save $10.00 when you pre-order this great product.Β  I will order it for you as soon as it comes available.Β  Or you can get it for 1/2 price.Β  Anyone who hosts a $400.00 party in October or November can get the new “My Digital Studio” for 1/2 price.Β  Plus they can get any other item of their choice from the mini catalog for just $10.00.Β  Click here for more details & to see the mini catalog.

Β 

Here is the fun page that I created to match my header.Β  You are just going to love this program.Β  Be watching for more fun samples.

Signature