Monster Birthday Card

Monster Birthday Card

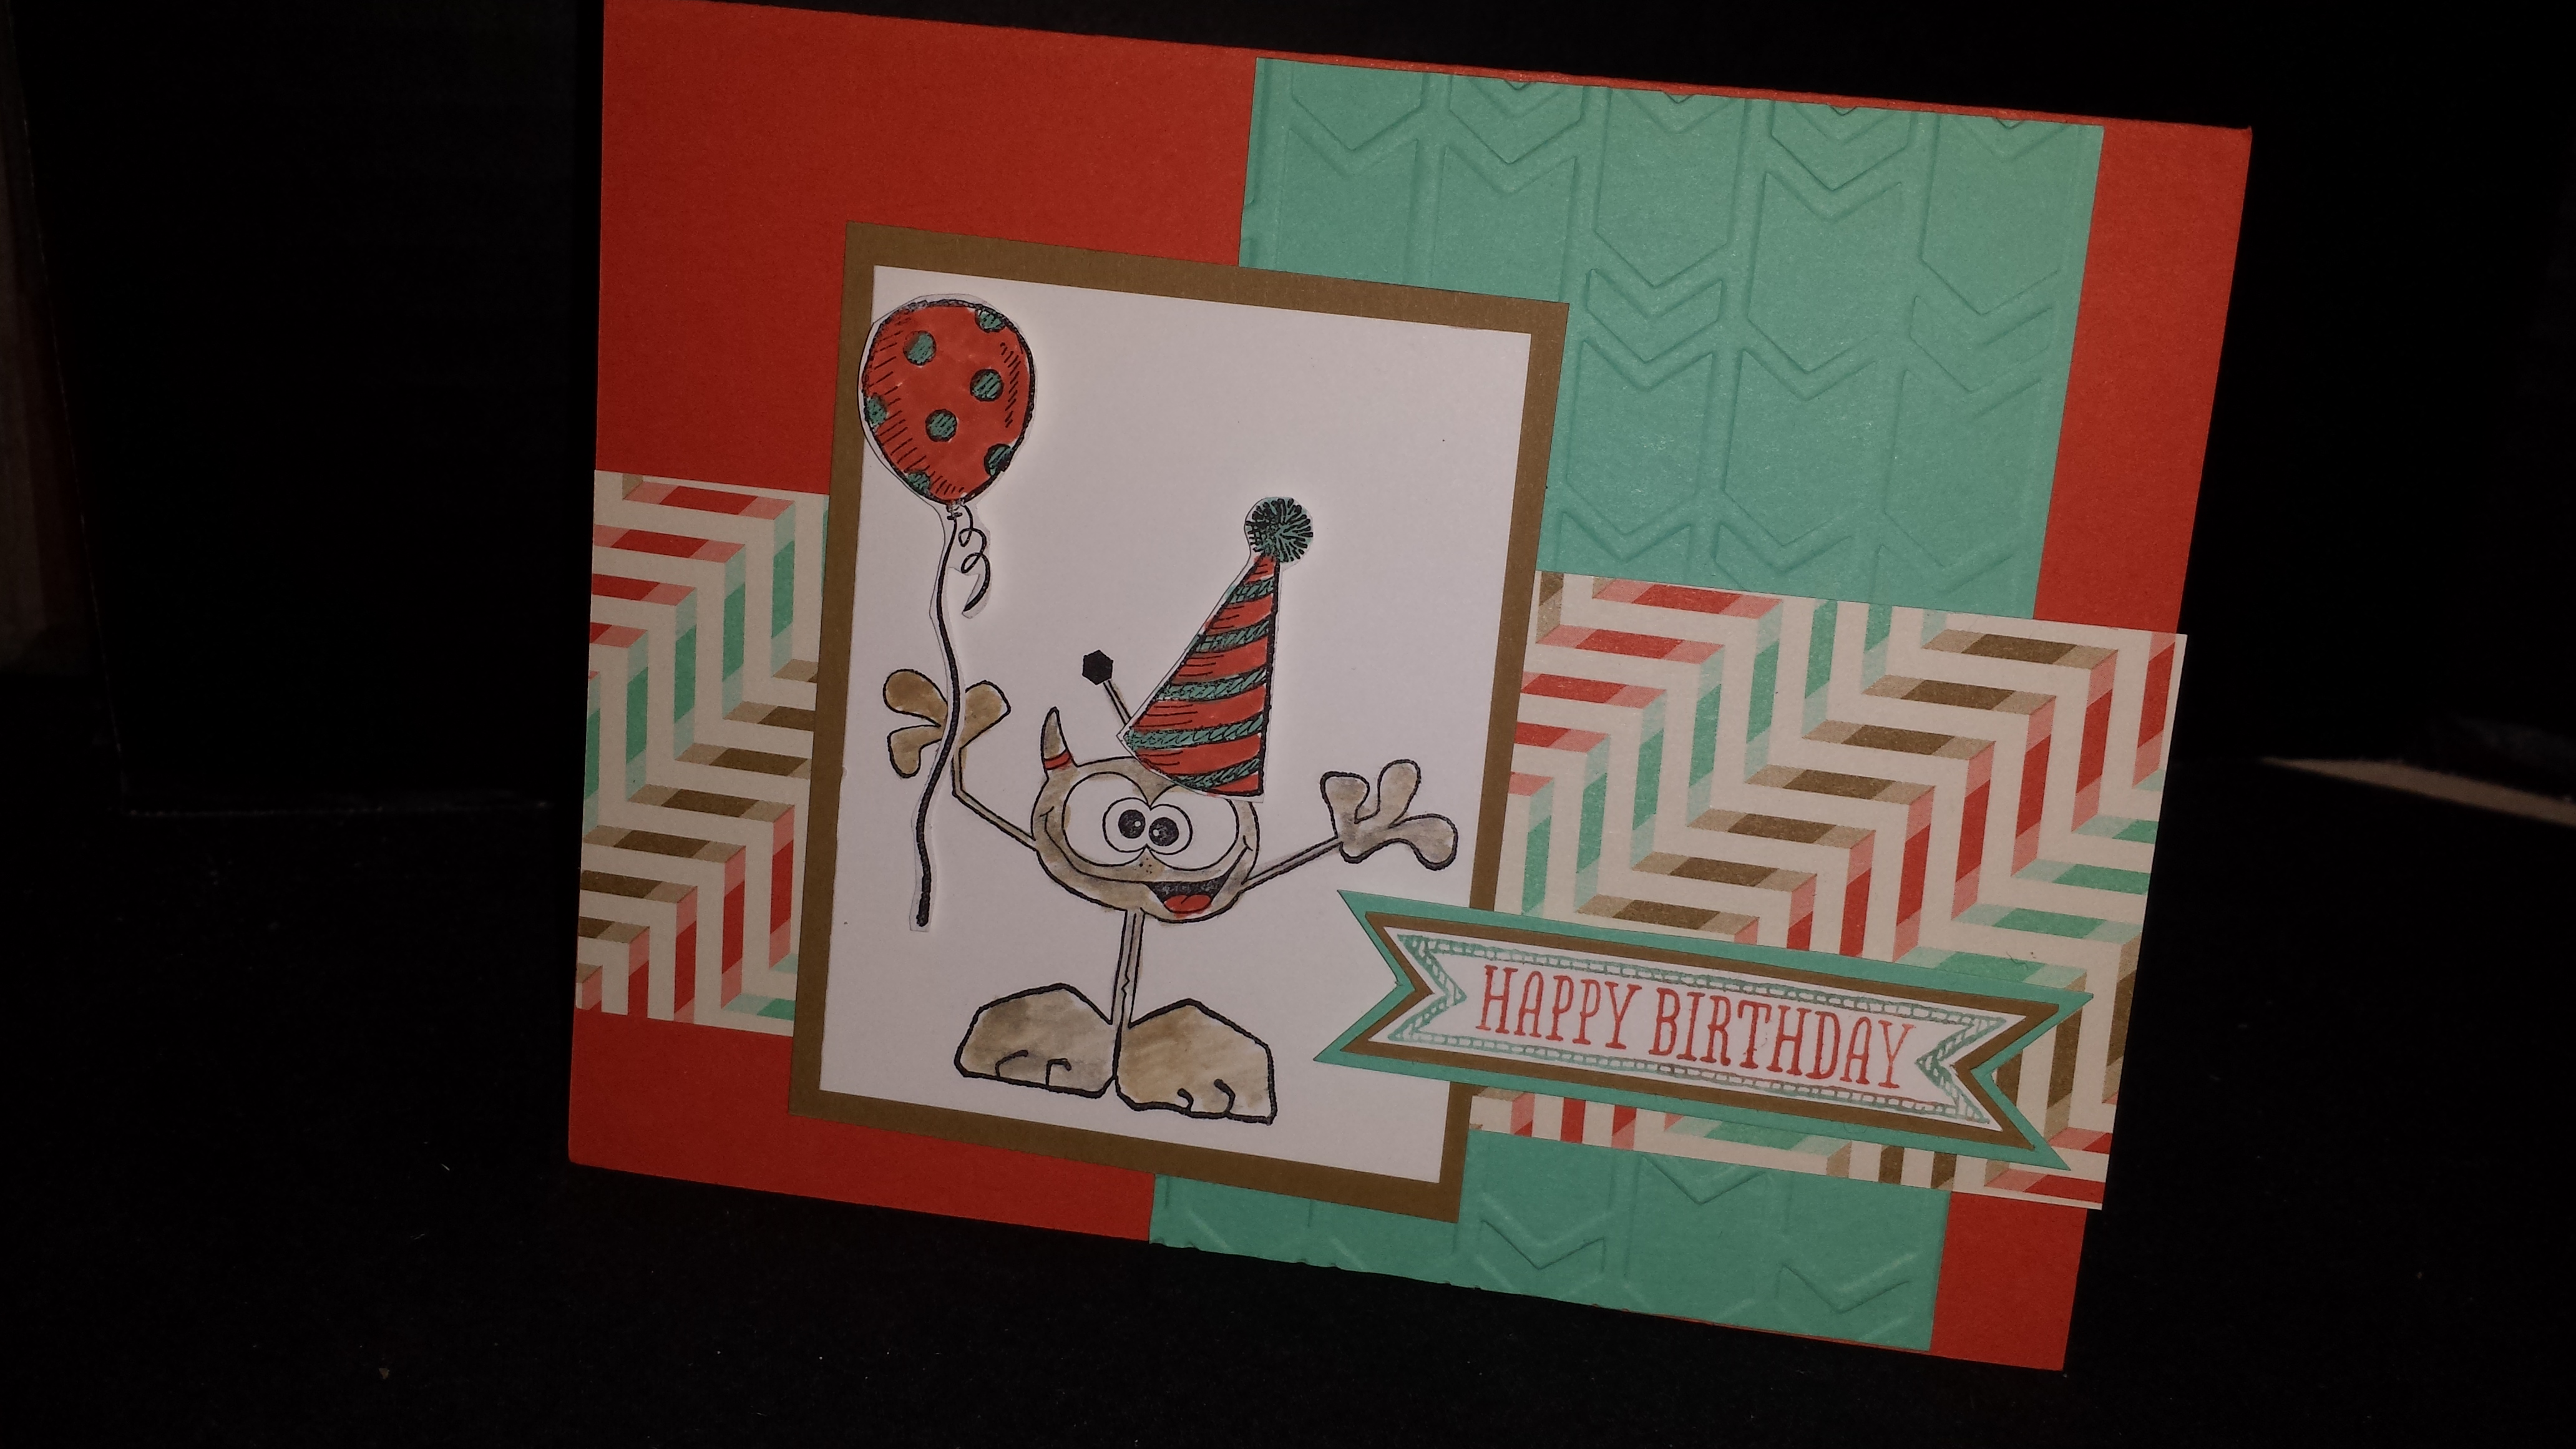
This was one of the cute cards from my Stampin’ Buffet last month.  I really love this monster set, I’m so glad I finally got it.  I’m also in love with this designer series paper.  I’ve had way to much fun with it.  I just really like the color combination.  It’s great for fun vibrant cards.  It’s also really good for boy cards which I tend to find a bit harder to create.

Monster Birthday Card- Close


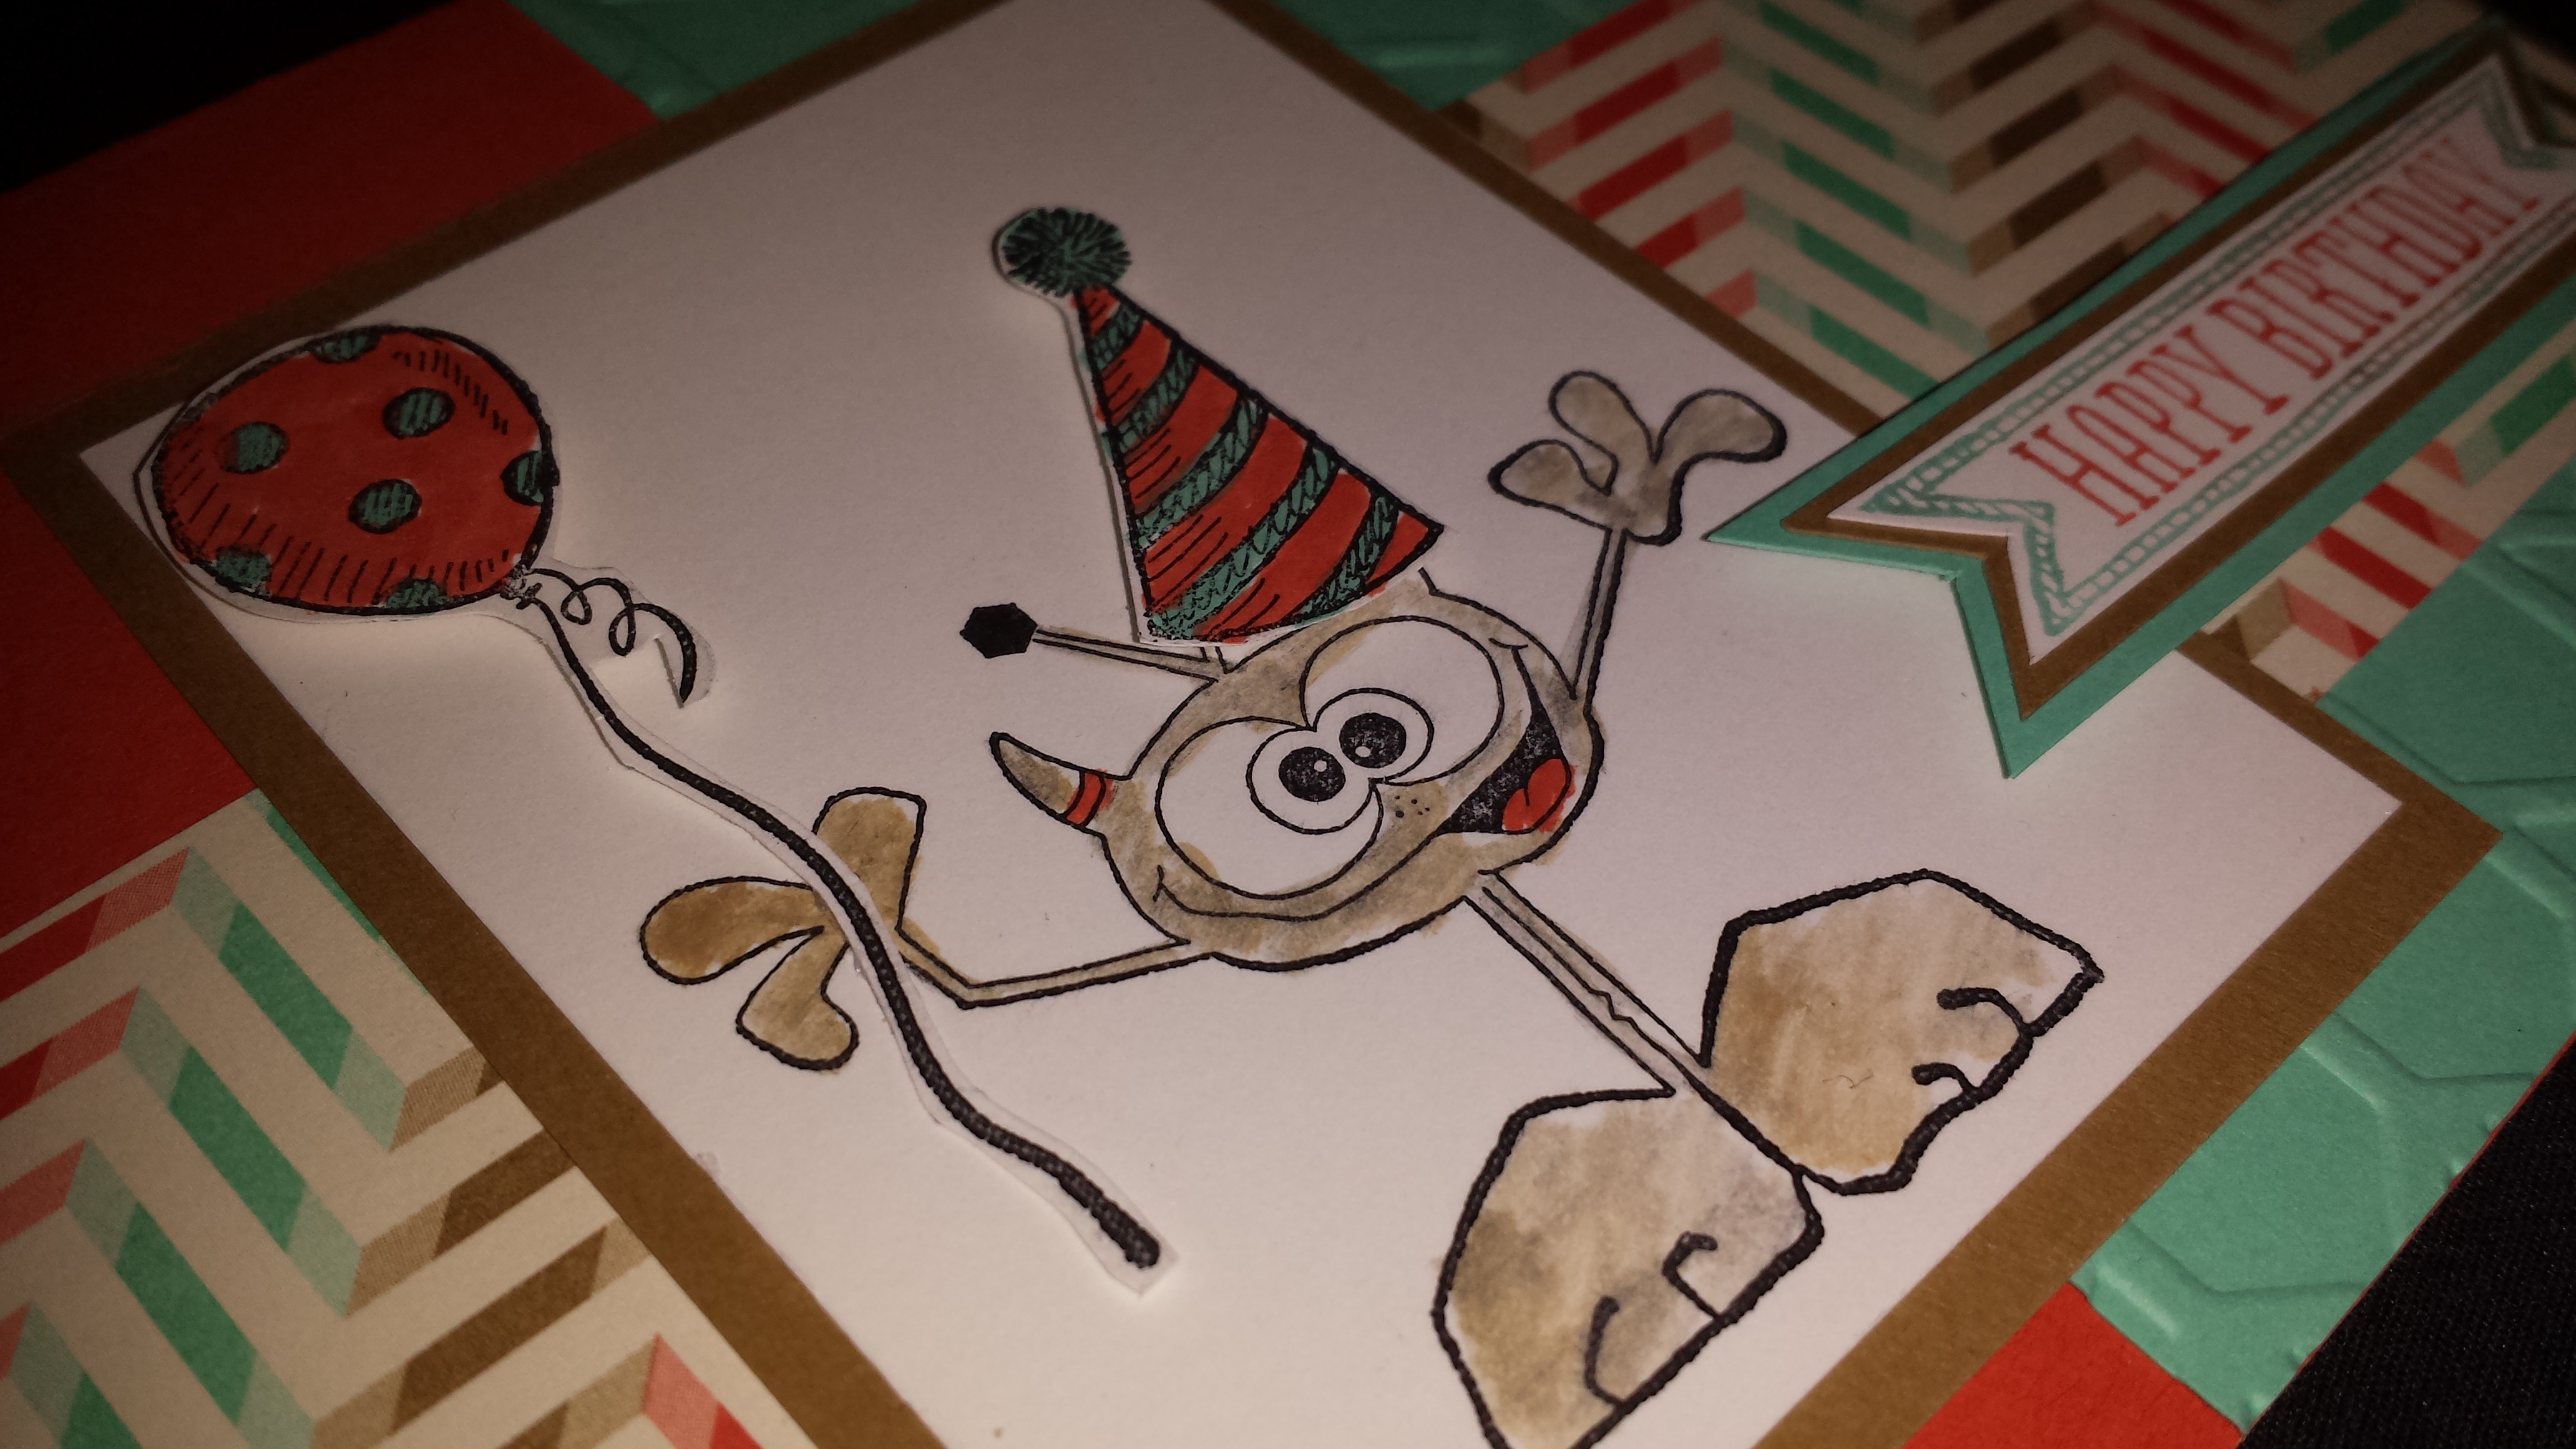
Here’s a little bit more close up of the monster.  I colored him with a blender pen.   I used dimensionals  to make the balloon and the hat really pop.  I also used them behind the Happy Birthday.  Do you love how the fun retro paper works so well with this embossing folder?  I do.

Tag SignatureOrder online 24/7
Contact me to order or book your party today!
435-245-5321 Home
435-232-2655 Cell (Text)
andersoncandice@hotmail.com

Products used:

Colors:
Tangerine Tango, Coastal, Cabana, Baked Brown Sugar, Basic Black, Whisper White

Stamps:
Sketched Birthday
Wood- #130423 $24.95
Clear- #130426 $17.95

Many Monsters
Clear- #134972 $14.95

Big Shot:
Arrows Textured Impressions Embossing Folder #132187 $7.95

Others:
Retro Fresh Designer Series Paper #132993 $10.95
Blender Pens #102845 $9.95


Stampin’ Buffet February 2014

Check out the cute cards you can make this Thursday at my Stampin’ Buffet.

February 2014 Stampin' Buffet Cards

I’ve already highlighted many of these.  I’m so in love with all of them.  The feature lots of great sets and products from the Occasions catalog as well as the Sale-a-Brations.  Remember they are just $1.00 each.  It’s first come first serve make how many you want and variety.  You can decide which ones to make when you get here, just please let me know you are coming.

Please join me:

Thursday, February 20th

Click on a time to RSVP:
11:00 am – 2:00 pm

5:00 pm – 8:00 pm

Looking forward to seeing you there.  Please let me know if you have any questions.

Tag SignatureOrder online 24/7
Contact me to order or book your party today!
435-245-5321 Home
435-232-2655 Cell (Text)
andersoncandice@hotmail.com

February Club Sneek Peak

I just finished the projects for next weeks stamp club and they are so cute I just had to share a sneak peek.

Club Feb 2014 Sneek Peek 1

I saw these awesome bows on-line made with the envelope punch board and I just knew I had to try them myself.

Club Feb 2014 Sneek Peek 2

It took a bit to figure them out, but you can come to club and I’ll show you how to make them and display them on cute little projects.

Please Join Me

Wednesday February 19th

1:30 to 2:30

or

6:30 to 8:30

Remember to share the fun and bring a friend.  It’s always free to try it out.  See you there.

Click on the time above to RSVP.

Tag SignatureOrder online 24/7
Contact me to order or book your party today!
435-245-5321 Home
435-232-2655 Cell (Text)
andersoncandice@hotmail.com

Fun Bitty Butterfly Card


I saw this cute layout on Pinterest using hearts I think and thought it would be fun to try with the tiny butterfly punch.  Are you wondering how I got the patterned images on the butterflies?  I bet you are thinking that they are designer series paper.  Well you would be wrong.  I actually used some of the darling background stamps that came with one of my paper pumpkin kits.  Yes just another great reason to have Paper Pumpkin coming to your house each month.  Make sure you sign up before the 10th so you can get the free markers with your kit and get started having fun projects come to your home each month.  You’ll notice that I used the Decorative Dots embossing folder from Sale-a-brations again because I’m totally in love with it.  It’s a must have in my opinion.

Butterfly card

Be sure to sign up for Paper Pumpkin by February 10th and you’ll receive the 2012-2014 in-color markers for free.  Then you can create the same fun cards in even more great colors.  Click here to Join Now!   Plus you’ll get cute new projects straight to your door step each month. You can cancel at anytime so give it a try.

Tag SignatureOrder online 24/7
Contact me to order or book your party today!
435-245-5321 Home
435-232-2655 Cell (Text)
andersoncandice@hotmail.com

Products used:

Colors:
Crisp Cantaloupe, Calypso Coral, Whisper White, Basic Black, Blushing Bride

Stamps:
Lots of Thanks
Wood- #129687 $22.95
Clear- #129690 $16.95

Paper Pumpkin
Dots & Chevron

Punches:
Bitty Butterfly #129406 $15.95

Others:
White Baker’s Twine #124262 $2.95
Decorative Dots #133520 SAB Free


Signature Stamps in MDS

Last year my grandmother passed away and I had the opportunity to create a book for our family to remember her. My Digital Studio made this so easy. I had all our friends and family send me pictures of Grandma. Once I had those I was ready to go. I started with the template Sweet Details which comes with MDS. I made a few changes to add in additional photo boxes to fit in all those great pictures everyone sent and added words that worked well with the pictures. I also left plenty of room for signatures.

Grandma's book Front
Once I had the book ready to go I printed at a local printers and placed it in smooth sheet protectors. We took the book to the funeral and had everyone sign on the sheet protectors with a sharpie marker and write a special memory about my Grandma.

Grandma's Book Signature on page protector
After the funeral I took the book home and flipped the pages over so that all I had was the signature with a white background. I scanned these into the computer then used Photoshop to delete out the white background and turn the image into a SVG file.  SVG file is the same type of file that MDS uses to create stamps in the program. I saved all of my signatures in MDS under stamps and I was ready to go.

Grandma's book Signature on white
I added each signature to the pages. This was really nice because I was able to change the colors to make them match, re-size if needed and even move to a different page to spread things out. I also moved embellishments and pictures if necessary to make all the signatures look good with the pages and pictures.
Grandma's Book MDS screen shot
After I had everything in I was able to print the book through Stampin’ Up! to have a nice finished book. We actually printed like 15 books so that each family could have book of their own and have all the great pictures plus memories. I love it because everyone was able to have this special book instead of just one person.

Grandma's Book Finished Signatures
I think this idea is perfect for family reunions, special birthdays, weddings, graduations really just about any special occasion that many people would love to have the memory. I plan on making one for my son that is graduating this year and have friends and family write special messages. I think this would also be great if your child is part of a team like band, cheer, dance or any group they spend a lot of time with. You can create a book with pictures from the events and messages from all the participants then add it all together so everyone can have a special memory book.

.

I know this is a little advanced but I wanted to share it anyway because it just really gets me excited. If you would be interested in my creating a book like this for your event please let me know. I’d be happy to help you, or if you would like to make one of your own I’d be happy to help you with the steps as well. Hopefully you’ll find lots of great uses for this idea. I even think it would be fun to have your kids write a message each year that you could add to the family year book and have their handwriting preserved from year to year and see how it changes. If you have any questions please let me know.

Tag SignatureOrder online 24/7
Contact me to order or book your party today!
435-245-5321 Home
435-232-2655 Cell (Text)
andersoncandice@hotmail.com

Products used:

MDS Products:
My Digital Studio
Disk #130647 $19.95
Download #130646 $19.95
Free Trial #130910 $0

Downloads:
Sweet Details Photobook template- #125742 $17.95


Dinosaur Punch Art

I’ve been seeing throw back Thursday on Facebook a lot and I thought it would be fun to do it on my blog.  I’m not sure that Thursday will always be a throw back, but I’ll try.  If you are like me you keep stamps, punches and even paper that you love even though you can’t by them anymore.  So I figure why not share some fun ideas to do with them.  Maybe I’ll even make some new projects using retired products.  Who knows.  So now lets get on with the project because hey that’s the fun part right?

Dino Chart

Every year Stampin’ Up! has a contest called the Artisan Design contest.  I’ve entered many years, while I’ve never won I’ve had my projects shown at Convention and I’ve enjoyed creating them.  It does however make me sad to give them away.  Some of them I’ve re-created and some I’m still planning on it.  This is one of the still planning on it projects.  Hopefully before my little boy grows out of dinosaurs.  I think this was the hardest one to give away and I wish I had it still.  It was also quite big so I actually took it to Stampin’ Up! (Good thing I live close.)

Dino Chart Top

This is the top of the chart.  I used MDS to create all the pictures for the chart.  I changed them all to Sepia so they would match and added a fun background.  I also added the age and height.  He was only 5 when I made the chart so I left spots to add more pictures over the years.  I attached twigs to the top to hang it with.  Of course the top picture is when he was born.  So cute.

Bird Dino

Here’s a better picture of the bird Dino.  All of the dino’s are made using punch art and shapes from the big shot.  Can anyone guess where I got my inspiration for my characters.  Yep “Land Before Time.”  You can also see the close up of the texture on the letters.  I cut them out of chip board and paper, then glued the textured paper to the clipboard.

Green Dino

Next is my green Dino working his way up the mountain.  The mountain is just created by tearing up paper and crumbling it up then smoothing it out.  I used the directly to paper technique to add texture.  (That’s where you just take the ink pad straight to the paper to highlight the texture and edges.)

Brown Dino

Here’s the brown Dino.  I think I actually used the leave die to make the splotches on his back.  You’ll noticed I also added some grass to the mountain by just tearing up paper and snipping the edges.

Orange Dino

This one wasn’t really in the movie, but I wanted one more to work with the spacing.  I think he turned out cute.  He also had to be orange because that’s my son’s favorite color.  The ruler was created by using the simply scored tool.  I placed a cardboard so I would know how far to score each section so they stayed even.  Then I flipped it over and used a sponge to highlight the marks and added the numbers with the calender set.


T-Rex Dino

Of course we had to have the T-Rex at the bottom chasing the little Dino’s up the chart.  I left space on the side so that I could mark the height and write the date.  My son was very disappointed that I gave away the T-Rex.  That’s his favorite Dino.  Just posting about this makes me want to re-create it.

I hope you have enjoyed my throw back Thursday.  As you can see I really do love punch art.  It’s so fun to see what you can create using our awesome punches.  Especially something they weren’t designed for.

Tag SignatureOrder online 24/7
Contact me to order or book your party today!
435-245-5321 Home
435-232-2655 Cell (Text)
andersoncandice@hotmail.com