Stampin’ Sunday 1-4-09

wb-topAfter I finished making the little wish boxed designed by Kelly Gettelfinger the I showed you in my Marvelous Monday post on December 29th I realized I still had a lot of stuff left from my Simply Scrappin’ Kit.  So I decided so see what I could come up with.  I got the design for this from one of Patty’s posts.  So here is what I came up with.

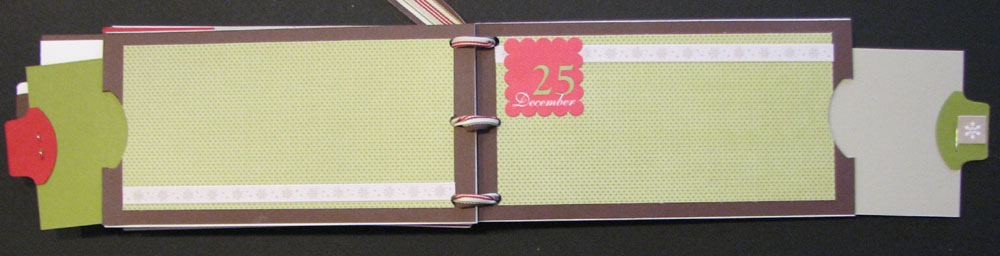
I used the long ended envelopes to create my book.  First I sealled them the cut of the very edge to make a pocket.  Then I used my punch to punch a whole in each one to make it easy to pull out my cards. 

I covered both sides of each envelope with paper.  (I didn’t have enough paper left for these so I used some that I had, same thing with the pullouts.)  I used the crop-a-dile to punch the holes in the side that I tied my ribbon through.  I used the Aspen ribbon from the mini catalog. 

wb-openI think this is a great book because of all the pull outs.  It really allow you to put lots of pictures in it and it make a great gift.  I used my extra pieces from the “I wish” Simply Scrapin’ kit to decorate my book.

Click here to see all the pages.

Remember that this great kit could be on the retired accesories list. (I won’t know for sure until tomorrow.)  So order yours today to make sure you get one.  Click here to start placing your on-line order.

Click here to see more weekly Challenge Projects

Kits of the Month-Jaunary

Some of you many have noticed that I have the new January Card kit of the monthup.  I’ve also decided to add 2 new types of monthly projects.  I’ve added the page of the monthand the project of the month.

Just like the card kits you will get all of the consumable products you need such as paper, ribbon and some accessories.  I will be featuring one stamp set in each of the different kits.  You can always get this set on sale with the purchase of the monthly kit.

In addition I’ve added a Kit Night.  This will be the last Thursday of each month.  This is a night that you can come and use any of my products to complete your monthly kits.  If you have loved the monthly kits, but are missing several of the products and just can’t afford them  this is the best place to get them all done.  You must pre-order your kit by the 15thof each month in order to attend the kit night.  You can still order any of the kits by the 25thof each month and pick them up later or have them shipped (additional charge).

You can see more information about each kit and the current kits by clicking here.  Please contact me if you have any questions.

Here is a preview of the kits for this month.  Click on any of them to go directly to that kit.

jan-09-card-2Card kit


love-tinProject kit


snow Page kit


I hope you will enjoy this new program and take advantage of it.  I’m not the one that designs the card kits but I will be doing the other two so if there is any set that you would love to see featured please let me know.

I just want to quickly clarify.  This is a different program than my monthly club.  There is no commitment simply pick the ones that you want to do and let me know before the cut off date.

Wacky Wednesday 12-31-08

christmas-bag-topperThis is the fun Christmas Topper that I made.  I made one for each of my down-line and filled the bags with goodies for their business.  I thought they were cute and really easy. 

I used the snow swirled set with the Big Shot Snowflakes.  The bag is actually a larger one than Stampin’ Up! sells because I wanted to put 8 1/2 x 11 paper in them.  The top is made with a 1/2 a sheet of 12×12 paper and scored 4″ down.  Then I cut a slit in the top for the handle so that I would just slip the topper over the bag after it was filled. 

If you ever need a quick gift idea try a topper they are so easy and so cute.

Click here to see more weekly Challenge Projects

Freewheeling Friday 12-19-08

I was going through some of my Holiday Decorations and discovered these two great frames I made last year.   I thought I would share them with you today since the background was so simple to make.  I just used the Versa Mark with our Bold Snowflakes Jumbo Wheel.  f-noel-frame

I know it’s really hard to see but it looks great in person.  I’ve added a close up shot so hopfully you will be able to see the effect.  The are really fun to put out for the holidays.  f-holiday-frame-close

I really like the big one because I can change out the picture when I want to.f-holiday-frame

Click here to see more weekly Challenge Projects

Thrifty Thursday 12-18-08

Here is a fun idea to put your Big Shot to good use.  I love to let the kids make little gifts for their friends at Christmas time.  This year I was so excited because I knew the Big Shot would make it so easy and very cost effective.  t-zack-big-shott-mikey-topperst-toppers

My boys had fun creating these cute Christmas gifts for their friends.  Here are a few pictures. 

t-reindeer-topperThe basic idea is really easy all you need is 1/4 sheet of paper plus some scraps for the punches.  Then you need the little bags and some ribbon. 

t-tree-topperWe used the Stampin’ Up! Exclusive Top Note Die to cut out the toppers then scored them the short way and folded them in 1/2. 

t-snowman-topperWe filled the little bags with treats and stapled them to the back of the topper.  Then I tied the ribbon around it.  We used the scallop punch, the 1 3/8 Circle Punch and the 1 1/4 Circle Punch to create our little tags. t-dj-toppers

 The boys each choose 2 favorites from the Hostess set “Deer Friends” and colored the stamps to get the great colors.  We used just one Stampin’ Dimensional on the bottoms so that you could slip the ribbon off the top and get to the treats.  t-zack-toppers

The boys had a lot of fun making them and especially loved using the big shot.  It was a fun evening.  Sorry it was so late getting this post up but we had to finish all of our projects. 

t-mikeyI think we made about 50 in about 2 hours.  Hope you enjoyed this and have fun making your own treat bags.

Click here to see more weekly Challenge Projects

Wacky Wednesday 12-10-08

big-shot-snowflakeWacky Wednesday- Big Shot Snowflake

Today was crazy because it was club and of course things did not go according to plan, but here is my Wacky Wednesday Project.  It’s actually really simple.  I came up with it from the circles that are folded in half when you cut out your pendent dies.  You would add them to your banners when you make them.  So I decided to try it with the snowflake die. 

  1. First you need to cut out 3 of the snowflakes with your Big Shot. 
  2. Then you have to fold them in half.  This is actually the tricky part.  I start by folding both the edges in half then I fold the centers over to meet each other and press in the center.  This leaves just a little part on each side to finish folding. 
  3. Once all off your pieces are folded you need to unfold one of them and apply glue.  I use the two way glue pen. 
  4. Next I apply half off one of the snowflakes to each side.  Then apply glue to one side of the two remaining pieces and put them together. 
  5. When you are done you should have a 3 dimensional snowflake.  You can hang a piece of silver or gold cord from them to let them hang.  I put them in my Christmas Tree and they look great.  Hope you have fun with this one.  My kids love it.

Click here to see more weekly Challenge Projects

If you really want a Big Shot you can check out my
Big Shot Lay-A-Way plan.