On my Monday Live, I shared an easy-to-make fun fold gift card holder inspired by my recent mini album. This sweet project features brand-new products that were released just yesterday, and I absolutely love how simple yet impressive this design is.
Card Base & Structure
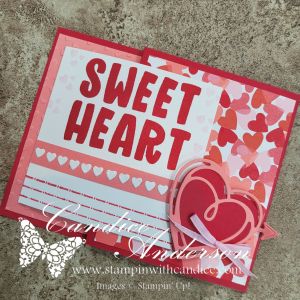
Start with a piece of Real Red cardstock cut to 4-1/4″ x 11″.
Score at 5-1/2″ and 9″.
- The 5-1/2″ section will be on the left side of the card.
- Fold the 2″ section inward, then fold again on the 5-1/2″ score line.
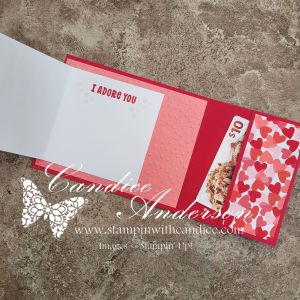
- This creates a pocket on the inside of the card.
Secure the sides of the pocket using Tear & Tape (#154031), leaving the top edge open so you can tuck in a gift card or cash.
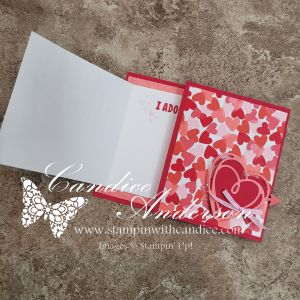
Inside Panel
Cut Flirty Flamingo cardstock to 5-1/4″ x 4″ and emboss it using the
Hearts of Love 3D Embossing Folder (#167071).
Attach this to the inside of the card on the 5-1/2″ x 4-1/4″ section.
Designer Series Paper
From the Made with Love Designer Series Paper (#167054), cut:
- 4″ x 3-1/4″
- 4″ x 1-3/4″
Place these pieces on:
- The 3-1/2″ section folded to the front
- The 2″ section folded inside to form the pocket
Left Folding Panel
Cut Basic White cardstock to 3-1/2″ x 7″ and score in half at 3-1/2″.
Stamp “Sweet Heart” from the Love Story Stamp Set (#167065) on the front and decorate as desired.
Attach this panel centered over the embossed section on the left side of the card base.
For one version, I placed the mini hearts directly on the white panel. For the second card, I added them to a 1/4″ strip of coordinating paper for a slightly different look.
Closure & Finishing Touches
For the closure, cut:
- One solid heart
- One lined heart
Using the Endless Love Dies (#167061).
Add arrows if you’d like for extra detail.
Attach the hearts to the front using Stampin’ Dimensionals, creating a small pocket for the folded panel to tuck underneath.
Finish the card with Bubble Bath Faux Linen Ribbon (#167075).
I love how simple and easy this fun fold gift card holder is to make, yet it has such a wow factor. Be sure to check out the video to see the step-by-step process, and I can’t wait to see your ideas using this design and these beautiful new products!
👉 You can shop current Stampin’ Up! supplies and tools here:
Shop with Me Here

Please feel free to contact me if you have any questions.
Contact me today to place your order!
435-232-2655 Cell ( Call or Text)
andersoncandice@hotmail.com