A Floral Favorite + Cozy Cocoa = One Beautiful Winter Card
When I started today’s challenge, I’ll be honest—I had no idea where I was going. The themes Pinecone & Poinsettia Elegance and Cocoa & Company felt so different, and I wasn’t sure how they were going to come together on one card. But poinsettias are one of my absolute favorite holiday flowers (yes, I buy a new one every year!), so I knew I wanted to start with the retired Poinsettia Petals Stamp Set (#153475) and Dies (#153522).
From there… the magic started to grow.

🌺 Watercolored Poinsettias & Layered Florals
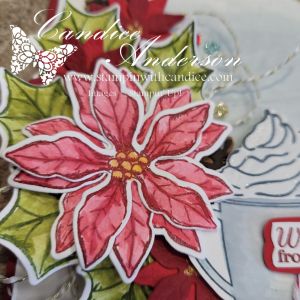
I began by cutting a bunch of pieces from the poinsettia and pinecone dies. I wanted a soft water colored look, so I stamped the poinsettia outlines in the darker shade and then water colored with the Water Painters (#168253) using the lighter shade.
Color Choices:
- Flowers: Cherry Cobbler + Real Red
- Flower Centers: Crushed Curry
- Leaves: Mossy Meadow + Old Olive
I also cut additional small flowers in both Real Red and Cherry Cobbler, layered them together, and added Gold Metallic Enamel Effects for the centers. The dimensional layered look was gorgeous.
🌲 Pinecones & the Perfect Focal Element
For the pinecones, I used:
- Pecan Pie cardstock
- Early Espresso cardstock
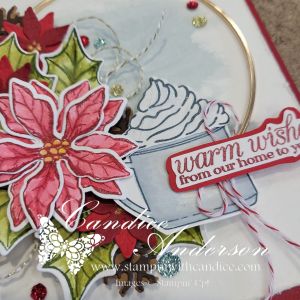
I was arranging all my pieces when something caught my eye: the retired Large Gold Hoops (#166004). Suddenly, the card clicked into place. The hoop became the perfect wreath-like frame to build my poinsettia cluster around.

☕️ Bringing in the Cocoa Theme
Next challenge: how do I incorporate cocoa into a poinsettia & pinecone card?
I had two great current product options, and ultimately went with the Weekend Adventures Stamp Set (#167318) for the mug. For the whipped topping, I used the More Than Autumn Stamps (#164228) and Dies (#164075).
Details:
- Mug stamped in Secret Sea
- Interior washed with Cloud Cover
- Whipped topping sparkle added with Wink of Stella
The greeting was stamped in Cherry Cobbler, fussy-cut, layered onto Real Red, and fussy-cut again for a bold double-layered sentiment.
I tied a small Real Red Baker’s Twine Bow (#164051) to the mug for a cozy finishing touch.
🎨 Soft, Vintage-Inspired Background
I didn’t want a stark white background, so I used Watercolor Paper (#149612) and did a soft wash using Cloud Cover and my Aqua Painters. Then I roughed up the edges with my scissors and bent the corners slightly for a worn, distressed look.
This gave the whole card a warm, handmade, winter-cozy feel.


✨ Assembly & Final Touches
With all the pieces ready, I began arranging and adhering everything around the gold hoop—
using lots of Dimensionals and Mini Glue Dots to secure every element and build incredible depth. Bonus water coloring the paper adds automatic depth by warping the paper. I did use a bone folder to add a bit of a curl to the petals.
I finished the front with the Traditional Sparkling Sequins (#165875), using a variety of colors to add softness, shine, and movement.
Since the card base is Cherry Cobbler, I made sure to decorate the inside as well. I added a Merry Christmas sentiment, tucked in a few small poinsettias, sprinkled more sequins, and mounted the whole inside layer onto Old Olive cardstock for balance and contrast.
This is definitely not your typical flat card—it has layers, depth, movement, and dimension and doesn’t exactly fit within the confines of a standard mailable design. But it is perfect for that special someone you want to hand-deliver a card to… the kind of card that truly shows how much you care. The pictures don’t do it justice. I made a quick video to help showcase the texture and depth to this card.
❤️ Final Thoughts
I love how this card evolved from “I have no idea where I’m going” to one of my favorite designs of the entire month. The mix of elegant florals, rustic pinecones, and a warm mug of cocoa created such a charming, heartfelt winter masterpiece.
👉 You can shop current Stampin’ Up! supplies and tools here:
Shop with Me Here

Please feel free to contact me if you have any questions.
Contact me today to place your order!
435-232-2655 Cell ( Call or Text)
andersoncandice@hotmail.com
💕 Let’s Stay Connected
📺 YouTube
📘 Facebook
📸 Instagram
📌 Pinterest
#StampinWithCandice #StamperCandi #ACardADayInNovember2025 #30DayChristmasCardMakingChallenge #ChristmasCards #HandmadeCards #CreativeTechniques #HolidayCrafting #cardmaker #cardmaking #christmascards #handmadecards #papercraft #StampinUpKits #christmaschallenge