A little Halloween Fun

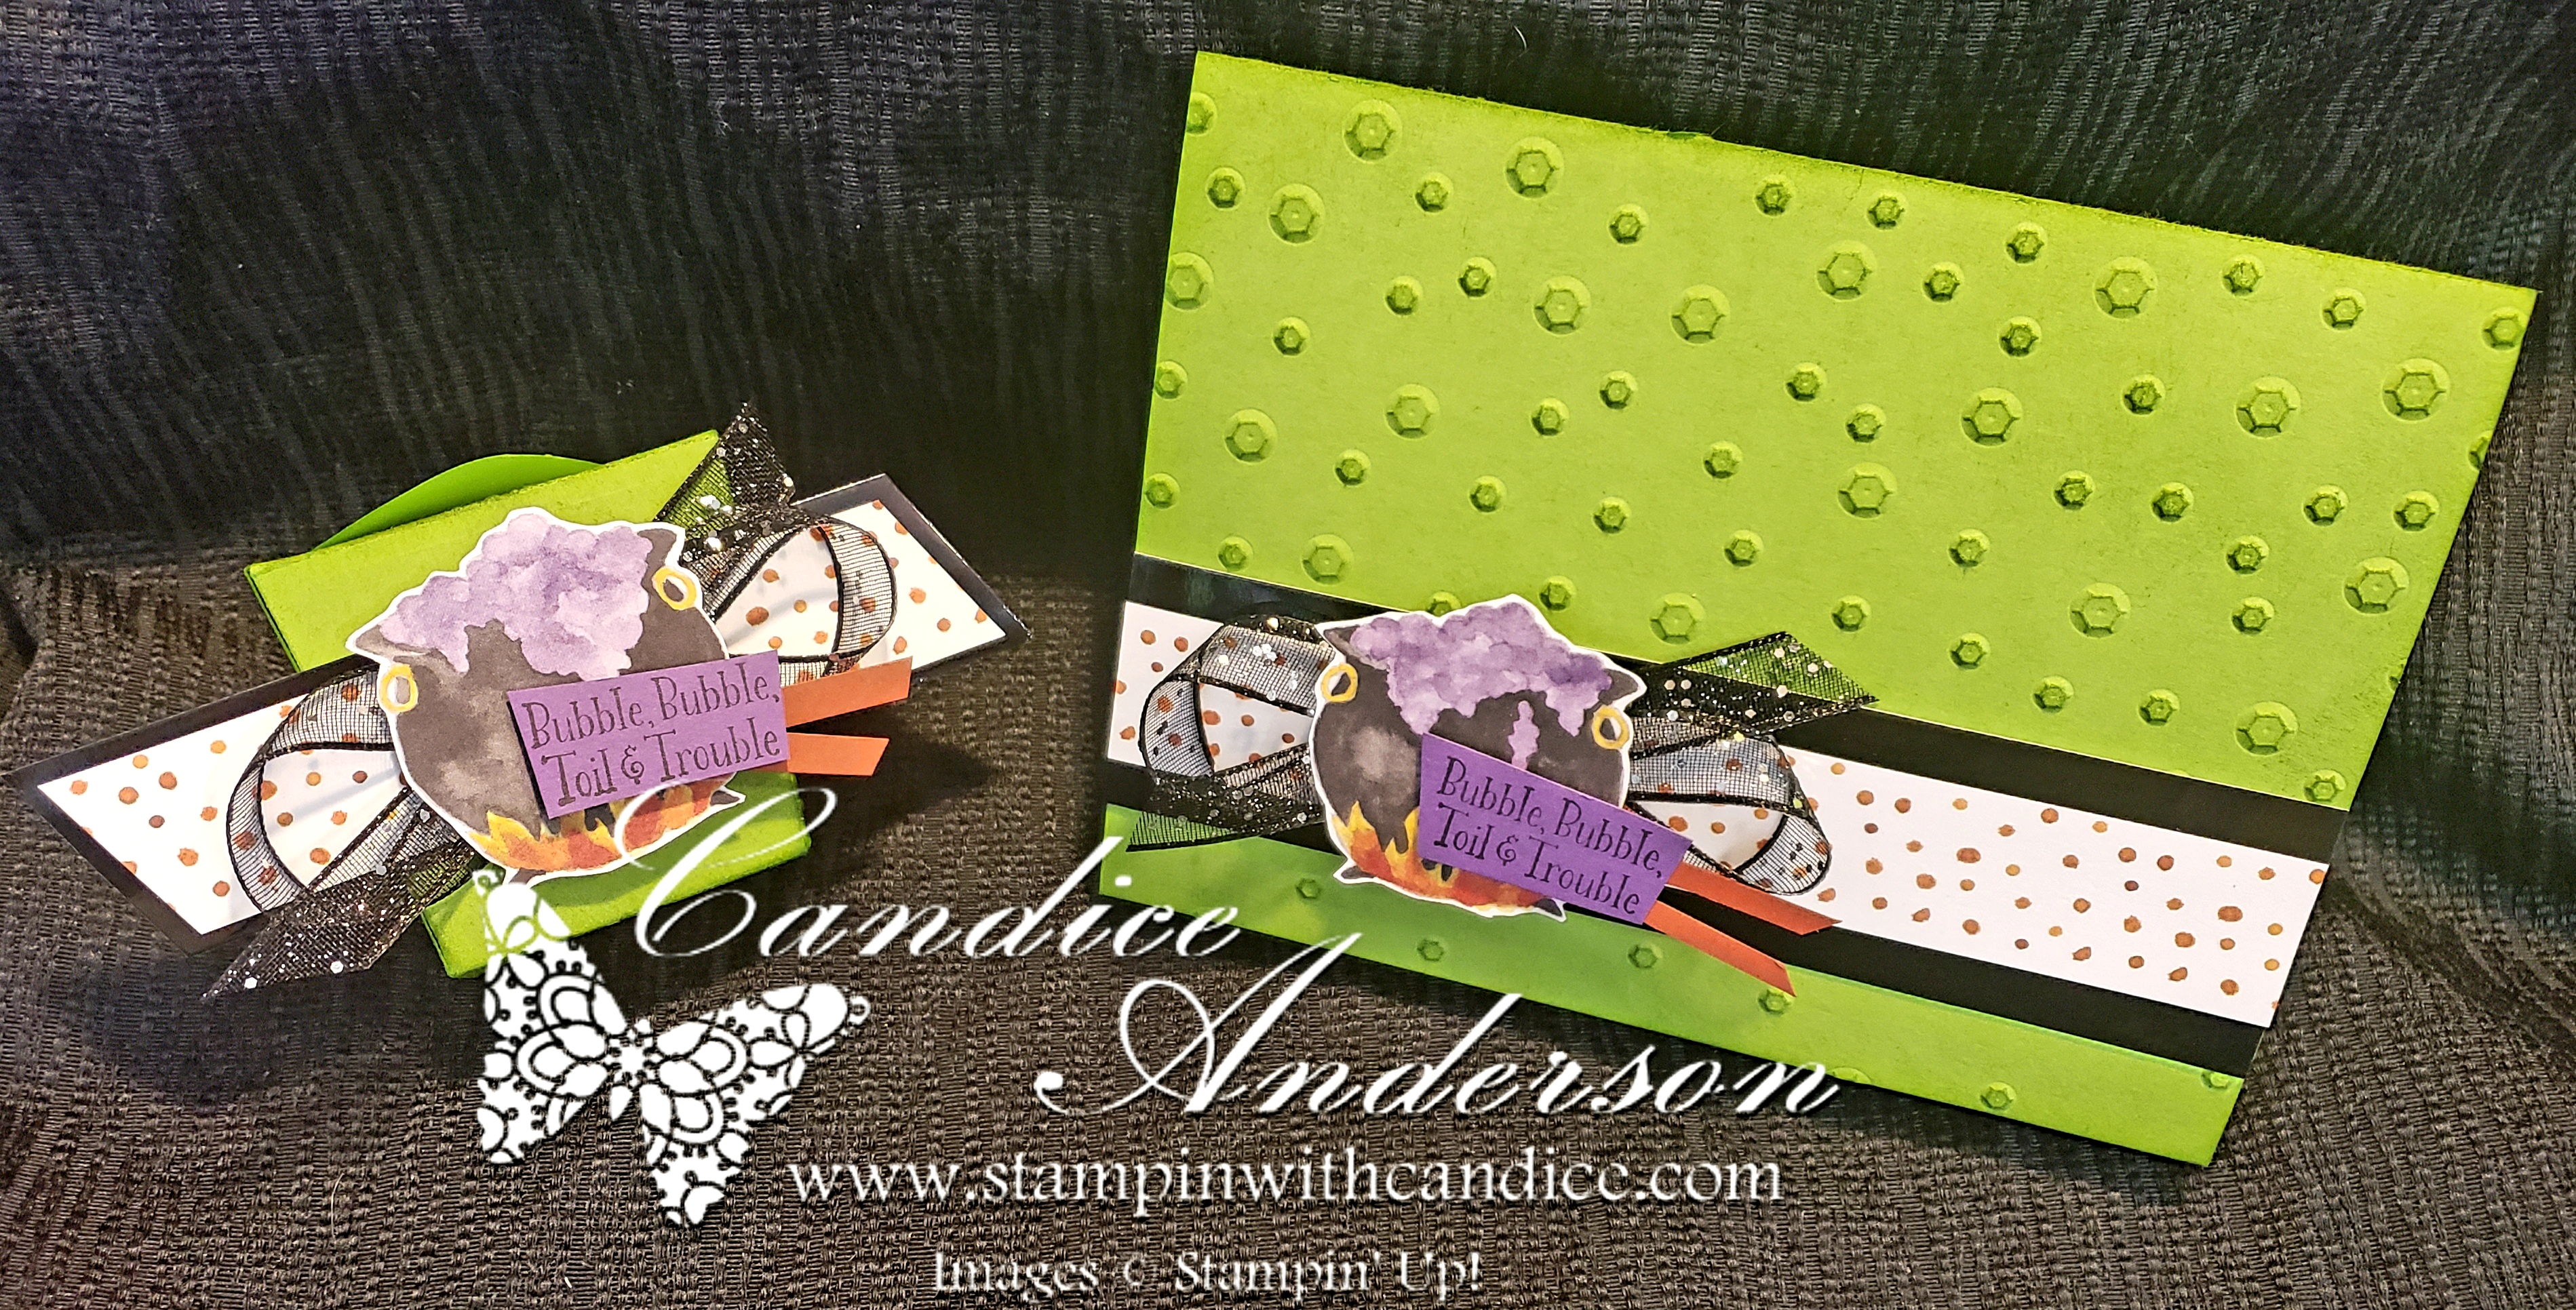
I had the chance to create some fun Halloween projects over the weekend.  I created the take-out-treat box first and thought it turned out so cute that I wanted to try it on a card.

This fun project was created using:

  • 147927 $33.00 Take out Thinlits Dies
  • 147531 $11.00 Toil & Trouble Designer Series Paper
  • 147898 $4.00 Black Foil Sheets
  • 147897 $8.50 Glittered Organdy Ribbon
  • 147713 $29.00 Cauldron Bubble- Wood or
  • 147710 $21.00 Cauldron Bubble- Clear
  • 145649 $10.00 Scattered Sequins Embossing Folder

Colors used:

  • Basic Black
  • Granny Apple Green
  • Cajun Craze
  • Gorgeous Grape

Accessories & Adhesives Used

  • Sponge Daubers
  • Snail Adhesive
  • Paper Trimmer
  • Paper Snips
  • Big Shot Die Cutting Machine
  • Stampin’ Dimensionals
  • Mini Glue Dots

This were super fun and easy to make.  The treat boxes would be perfect for a child’s class, their good friends, a party or if you don’t have very many trick-or-treaters the few you get would love this special treat.  Remember you can order any of these projects on my site.  Please share you own holiday creations.  I’d love to see what you came up with.


Tag SignatureOrder online 24/7
Contact me today to place your order
or book your party!
435-232-2655 Cell ( Call or Text)
andersoncandice@hotmail.com


July 2014 Paper Pumpkin fun Wish Big

Can I just say I am so in love with this kit.  Seriously I had so much fun creating these projects.  When I saw the kit at Convention I couldn’t wait to get home and put them together.   I thought you would have a little fun walking through the experience with. Well kinda.  So here’s what you see when you first open the box.  This gives you a pretty indication of what every box looks like.  Just like opening a present right?

Opening Paper Pumpkin

I didn’t take a picture of everything all bundled up because I really wanted you to see what was included in this kit.  You get 6 boxes and 6 cards with envelopes.  While you get great instructions on how to make the projects on the front of the sample instructions they also love to give you extra stuff so you can have fun being creative.  This kit has so much extra stuff you will love it.

Contents of July 2014 Paper Pumpkin Kit

So first here are 4 boxes and 5 cards that I made using just what was in the kit.  Now most times you need to add adhesive and scissors, but this kit was great no adhesive needed (at least not to create the projects how they are show.)  You’ll notice that I’m only showing 5 cards and 4 boxes.  Well that’s because I already made a box and card a gave it away to an awesome customer.  The missing box, well that’s up next.


July 2014 Paper Pumpkin Kit Samples


Sara Douglass show us this idea at Convention and I just had to make one of my own.  So these cards are 2 3/4 x 4 1/4.  They are basically a regular card size cut in 1/2.  Now I could have cut the ones that came with the kit in 1/2 but I decided to just use 2 pieces of Whisper White Cardstock instead.


July 2014 PP- Cards in a Box


Now I’m sure you are dying to see the cute cards inside.  So here they are. For the most part they are just like Sara’s however I folded my cards different so I tweaked some just a bit.  I also used a few pieces of scrap Whisper White Paper for the popped up sayings as well as some dimensionals.  Now you will have plenty o the fun stickers, ribbon and accessories to make these cute cards.  I also used Softy Sky ink pad for some of the stamping.  I decided to include ribbon around the box along with a cute silver star.  Just a note I did cut off the top part of the box, I even used some of it on a card.  I also used some Soft Sky paper and the Envelope Punch Board to create a cute matching envelope.

Note- to make envelope start with a 6 x 6 paper. Follow the following punch and score system to create a rectangle envelope.

  1. Punch and score at 3 1/2
  2. Turn a 1/4 turn and punch and score at 2 1/2
  3. Turn  a 1/4 turn and punch and score at 3 1/2
  4. Turn a 1/4 turn and punch and score at 2 1/2

Once I was done I cut 1″ off the end that is in the inside the card but it’s not necessary.

July 2014 PP - Box Cards

These card’s inspired me to make some cards that would fit inside the box it’s self.  How cute are these.  So they are 1/2 the size of the ones above 2 3/4 x 2 1/8.  I was able to get all 8 cards out of one sheet of Whisper White Cardstock.  Again I added a few scraps of white, but the embellishments and stickers all came from the same paper pumpkin kit.

July 2014 PP- Mini Cards fit in box

So last I wanted to show you a card that you could make once you’ve created everything with your kit.  So this one is made with my own supplies with one exception.  I still had lots of silver stars left so I did use one of them.  This card will be featured at my  Stampin’ Buffet next month.  You’ll be able to come and make it for just $1.00 along with lots of other great cards.

July 2014 Paper Pumpkin- Thank Card


So I know you are just dying a wishing that you would have joined Paper Pumpkin already.  So be sure to sign up now so you don’t miss any more great projects.  Just so you know I’ve seen the next two months and you will seriously love them.  At least I do.   Here’s the info to get signed up and be sure to enter to code to get your first 2 months at 1/2 price.

So just to sweeten the deal a bit I have 2 special offers for you.

  • I have a special gift for everyone who signs up just to say thank you.
  • Click her to sign up for my  Paper Pumpkin Giveaway
    • For your chance to win a free month (US Residents only)
    • Contest open to anyone current, new & future Paper Pumpkin Subscribers
    • Must be 18 years or older and live in the US
    • If winner is not a subscriber they must sign up and activate their code by July 30th

JUST ONE MORE THING:

Join me to make your own box and card
Tuesday July 29th
7:30 – 8:30
My HouseRSVP:  435-245-5321
andersoncandice@hotmail.com
on line- Click here
on Facebook- Click here


So if I haven’t convinced you yet.  Check out this fun video my friend Heather Stevens made about why you should join paper pumpkin.  She even won first place at the Stampin’ up! Convention for this cute video.  I Just know you’ll want to sign up after seeing this.


Please feel free to contact me if you have any questions.

Tag SignatureOrder online 24/7
Contact me to order or book your party today!
435-245-5321 Home
435-232-2655 Cell (Text)
andersoncandice@hotmail.com

Extra Stampin’ Supplies Used:

Colors:
Soft Sky Ink Pad #131181 $5.95
Soft Sky Paper #131203 $6.95
Whisper White Paper #100730 $8.50

Adhesives:
Stampin’ Dimensionals #104430 $3.95
Multipurpose Liquid Glue #110755 $3.95

Others:
Paper Snips #103579 $9.95


A Little Thank You Tag

I had the opportunity this week to go down to Stampin’ Up! and help the advisory board with a project.   I wanted to take them a little gift just to say “thank you.”  I had lots of zucchini thanks to awesome Dad so I decided to make little zucchini breads with this cut tag.  I love how they turned out and it was so fun to share them with the hard working team.  I used the leaf from the holiday catalog along with a thank you set and the grunge set from the maim catalog.

image

image

I challenge you to brighten someones day with a fun hand crafted gift.  These simple tags were so quick but very much appreciated.

Handmade Holiday

Just in time for the Holidays’ Stampin’ Up! is offering big discounts on products that will make your holidays easier.  Be sure to contact me today to place your order or book a party.  Candice Anderson 435-245-5321 or andersoncandice@hotmail.com.

ABCs of the Perfect Handmade Holiday

Dates: October 19-December 16, 2010

Details

You and your customers will have the opportunity to purchase select products–perfect for Amazing cards, Beautiful packaging, and Cherished gifts–at a 20 percent discount! See bundle information below.  Click here for a printable flyer.

More Fabric Fun – Want it free? Ask Me?

I’ve have fallen in love with my Big Shot again.  Who knew fabric could be so fun.  So I had to share a few more projects with you.

First is my Flip Flops.  I was in the fabric store the other day and was talking to a girl.  She told me she had seen these cute flip flops with flowers on them and thought how cute it would be to make them.  Of course I loved the idea and knew how easy it would be to make them so I headed straight home to make my own.  If you would like some of your own it’s so easy.  You can buy the Big Shot or if you want to have a party I’d be happy to come and make some for you.  The flowers are so fun, because you can also put them in your hair, add them to a purse or a skirt or anything else you can think of.

Speaking of purses.  I’ve been having so much fun making new purses.  Here’s my latest one.  I even put in pockets on this one.  I’ve had lots of people ask me how they can make their own so I thought I’d give you three great ways to get one.

First I’m going to be doing a class.

I haven’t decided on a date yet, I will figure that out after I know who wants to come.  But I’m thinking it will be sometime in July.  The class will be just $5.00 however there are a few requirements.  First space will be limited.  You will only be able to make one purse with two outside side pockets.  The purse will be the same size as the one shown here.  Plus you will need to bring your own material, batting and sewing machine.  I will help you with everything else.

Second you can get one for FREE by hosting a workshop.

Yes I said FREE.  I will be making at least one, maybe more depending on how many parties I get.  I’m down to the end for earning my cruise to Alaska and I need a little help.  So I will be giving one away to one of my hostesses.  All you need to do is contact me to schedule your in-home party and you will be entered to win.  Now here’s the extra bonus.  You will get an extra ticket to win with every $100.00 in sales at your party as well as a bonus 5 tickets if you have a $400.00 party.  If you have a $1000.00 party you will get one for FREE.  Remember the retired list comes out June first so this is  a great time to have a party and help your friends and family get what they want before they are gone.

Third join my team.

I have loved sharing this idea with my customers and want all of my down-line to have it.  If you sign up before the end of June I will help you make one of your own, all you need to do is provide the materials.  Sign up by May 26th and I will provide the material for you.  Of course the best part about this option is you will get all the great products to get your business started and be able to start making money yourself.  Plus you will have the time of your life doing something you love.  Click here to learn more about joining my team.

Contact me today so you can start earning your RAG BAG now.

435-245-5321 Home

435-232- 2655 Cell

andersoncandice@hotmail.com

On the 7th Day of Christmas . . .

The Stampin’ Santa gave to you a Magnetic Build a Bear Santa Claus.

I love our Build a Bear Line.  We have fun stamp sets, paper as well as dies for the Big Shot.  Plus here’s a little secret.  These items will be around for  a while.  They are listed in the new mini catalog as well along with several fun new ones.  The Big Shot dies are so much fun.  Here I cut the bear out of Magnet as well as the clothes so they could be changed anytime, just like paper dolls.  The best part is they are bears so they appeal to both boys and girls and you can dress them up in both boys and girls.

You can find these silver skinny tins in our Clearance Section on-line.  They are while supplies last so hurry fast.  They are great because you can store all your pieces inside and create your bear on the outside.  They make a great traveling gift for kids.

If you would love to see more of this product in action let me know.  I’d love to do a Build-A-Bear Party.

You can find more info. on these products in our mini catalog.

To order call me at 435-245-5321 (Home) or 435-232-2655 (Cell & Messages.)  E-mail me at andersoncandice@hotmail.com.  Order on-line at www.candiceanderson.stampinup.net. Click on the shop now in the upper right hand corner.

Remember to check out my 12 Days of Christmas sale for all the great deals.  Plus the 12 Days of Holiday Sale that Stampin’ Up! is offering on fun dies for the Big Shot.

Have a Happy Holiday!