Technique Tuesday 1-20-09

I love this all in the family set but often times I’ve heard “I wouldn’t be able to line that up.”  Then I just say it’s easy with the stamp-a-ma-jig.  All you have to do is stamp the image on your imaging sheet then line it up where you want it remove the imaging sheet and line the stamp up with the jig and stamp.  Perfect every time. 

stamp-a-ma-jigHowever this set has lots of little pieces and I didn’t want to wipe off my imaging sheet every time so I came up with this.  I used the little celo bags and stamped one image in each corner (I used StazOn ink).  This way I didn’t need to keep wiping them off.  Then I just saved the bags and I have it ready to go any time I want to use this great set. 

front
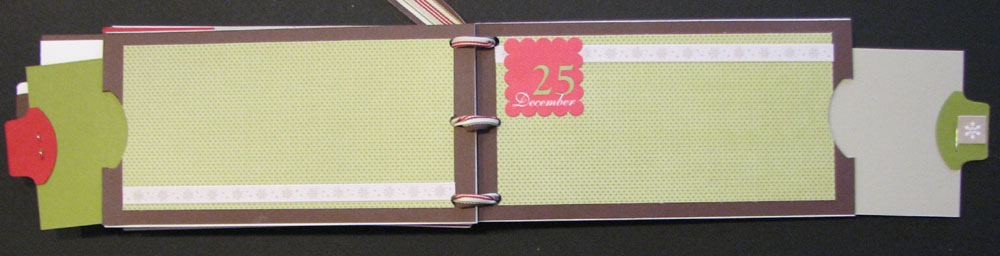
This fun page was created for my sister.  It was the front of the Calender I made her for Christmas. 

family-calendar-close-upHere is a close up of the cute little family.  In the set you can choose the head, body, feet and arms for all the larger family members.  There are also lots of fun accessories you can add as well as a cat and a dog.

101406 Jet Black StazOn Ink Pad $7.95
1101049 Stamp-a-ma-jig $11.95
103104 Small Flat (3×5) cellophane bags $3.95 (50)
113488 All in the Family $38.95
Fun accessories and wheel can be found on pages 76 & 77 of the new Spring/Summer ’09 catalog

Click here to start placing your on-line order.

Click here to see more weekly Challenge Projects

Marvelous Monday 1-19-09

cherishThis great page was done by my up-line Janice Barlow a couple of years ago for Convention.  I have always loved this page.  I just think the colors are beautiful together.  She colored the pretties flowers by putting them in a solution of ink refills and water I think.

Click here to see more weekly Challenge Projects

Thrifty Thursday 1-15-09

Have you ever tried one of those books where all of the accents are made with one piece of paper.  Well I wanted to give it a try.  I searched for patterns, but didn’t really find one that worked for what I was doing so I just made up my own.  If I can find it I will try and post it for you.

mb-frontThis is a great book to use for gift items, for kids or for something you just want a quick small scrapbook of that you can keep around the house.  I created this book for my son DJ.  It’s of his baseball team last summer.  The nice thing about it is that it’s quick and easy to make so you could make one for each kid or if they are old enough they could make their own.

First you want to decided on a theme.  I obviously used baseball here so I chose the Just Baseball set #109459 $12.95.  I also used the sporting set $109246 $17.95.

Then I picked the colors I wanted to use.  You want to choose 3 to 4 colors that you will used for the entire book.  I used Real Red, Night of Navy and Whisper White as my basic colors.  Then I added Close to Cocoa and Sahara Sand as my accent colors.  I picked my colors to match his baseball team colors and the colors of the equipment.

Next you will need 1 piece of 8 1/2 x 11 paper that you will be stamping on.  I used the Whisper White.  Then you just want to stamp your images on it randomly.  It doesn’t really matter where you stamp them because you are going to cut the paper all up.  I overlapped them a lot because I liked the look of it.

Once you have your paper stamped you will cut it up to the pattern.  Then you will need a piece of 8 1/2 x 11 paper of your accent color.  I have used the night of navy.  You would use the pattern to cut up this paper to go behind your stamped paper.

This book is a 6×6 and has 16 pages.  To save money I attached the pieces to both sides of the paper instead of using two different ones back to back.  It makes a total of 16 pages so you will need to sheets of 12 x 12 cut into 6×6 to give you 8 sheets.

mb-pg-7Once you have everything cut you can begin to assemble the book.  Here is just a sample of one of the pages.  You can click here to see the whole book.  I really will try to find the pattern and get it posted for you as well. 

I hope you try making one of these fun books for a loved one or letting your kids try one of there own. 

Some of the other great sets you could use to to create one of these books are: any of the sport ones, any flower sets, wild about you, bugs & kisses or just try it with your favorite set.

Click here to see more weekly Challenge Projects

Technique Tuesday 1-13-09

These awesome matches were made by my up-line Mindy Bywater.  She did them for a Convention Swap last year.  I think her and Janice used them for a club later because I made the card at one of Janice’s Demo Club nights.  Now your are probably wondering why they would be on technique Tuesday.  Well if you look closely at the ear of the Elephant you can see why.  On all of the animals she has used the beads.

I thought this was defiantly a fun and different way to use the beads.  If you’ve never tried them before then here’s the easy steps to use them.  I usually use both beads when I make things, but here she only used the micro beads.  I believe that we used the crystal effects.

First you want to stamp your image like normal.  Next you want to cut your image out if you are cutting them.  All the animals on the page are cut out.  The card is just on a square.  Once you have cut out your images you are ready to put on the beads.

wild-about-you-pagesI’m going to be bad here and suggest something other than our wonderful powder pals when working with the beads.  The reason is the tiny beads bounce really bad and are full of static.  I sometimes use the large powder pal underneath, but I’ve actually found what works best is a piece of paper folded in 1/2.  I use the grid paper because it’s nice and big.  I like the paper because it doesn’t cause as much static and I can fold it completely in 1/2 and pour the beads back into the container without them bouncing everywhere.

To apply the beads you want to apply just a very thin layer of crystal effects and then sprinkle on the beads.  Don’t worry about spilling some on your paper that’s why we made it so that we could funnel them back into the container. 

wild-elephantShake off any loose beads and set them aside and to dry.  Make sure you let them dry really good.  You don’t want to try and apply them to the page when they are still wet or you will squish your beads and it won’t look good.

If you are doing just a small area like on the giraffe.  (It’s just his tail and the top of his antlers.) The easiest and best way to do it is just to dip the end of the desired part into the beads.  This is a lot less messy and and a lot faster too.

Now you are probably wondering where she got the cute circles from that are on the two stripes.  It’s actually one of the center’s available for the Pick a Petal #109445 $27.95.  Another fun thing she added is all the dots on the words are actually brads.  They would also be really fun to do with the beads.

I hope you try this fun technique at home.  I will show you another time how to use the beads with both sizes.

Click here to see more weekly Challenge Projects

Stampin’ Sunday 1-4-09

wb-topAfter I finished making the little wish boxed designed by Kelly Gettelfinger the I showed you in my Marvelous Monday post on December 29th I realized I still had a lot of stuff left from my Simply Scrappin’ Kit.  So I decided so see what I could come up with.  I got the design for this from one of Patty’s posts.  So here is what I came up with.

I used the long ended envelopes to create my book.  First I sealled them the cut of the very edge to make a pocket.  Then I used my punch to punch a whole in each one to make it easy to pull out my cards. 

I covered both sides of each envelope with paper.  (I didn’t have enough paper left for these so I used some that I had, same thing with the pullouts.)  I used the crop-a-dile to punch the holes in the side that I tied my ribbon through.  I used the Aspen ribbon from the mini catalog. 

wb-openI think this is a great book because of all the pull outs.  It really allow you to put lots of pictures in it and it make a great gift.  I used my extra pieces from the “I wish” Simply Scrapin’ kit to decorate my book.

Click here to see all the pages.

Remember that this great kit could be on the retired accesories list. (I won’t know for sure until tomorrow.)  So order yours today to make sure you get one.  Click here to start placing your on-line order.

Click here to see more weekly Challenge Projects

Stampin’ Sunday 12-28-08

This is a fun Christmas book I made using the same pattern as the Family Book.wish-album 

It uses the I wish simply scrapin’ kit.  If you would like one of the kits you can order one for $20.00.  (I can ship them for an additional charge.)  Please let me know ASAP as I’m not sure how long the simply scrapin’ kit will be available. 

Click here to see all the pages of the book.

The original pattern was created my up-line Janice Barlow.

Click here to see more weekly Challenge Projects